
In this video tutorial you will learn how to apply digital tattoo’s using Paint Shop Pro. Have you ever considered getting a permanent tattoo? If so, you can use this technique to “try on” some digital tattoos.
That way you can see if you like them before they become, well permanent:) I have used this same process for myself and several friends in the past, to help them/me decide on the best tattoo design. Even if you are not considering ever getting a real tattoo, this technique is still fun to play around with. You can also find a variety of nice tattoo designs at http://browse.deviantart.com/?order=9&q=tattoo%20designs&offset=0
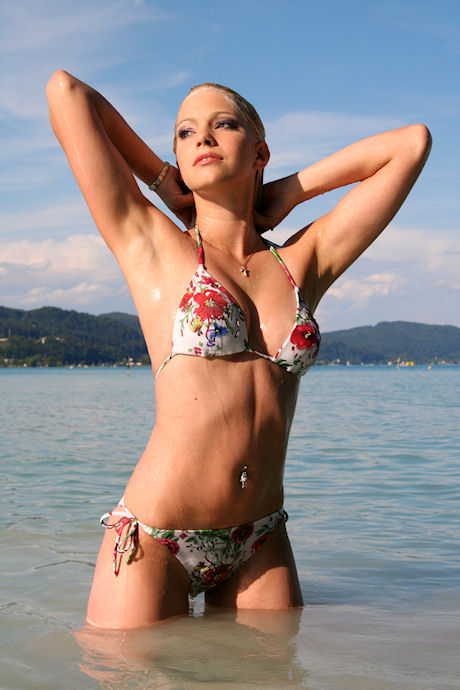
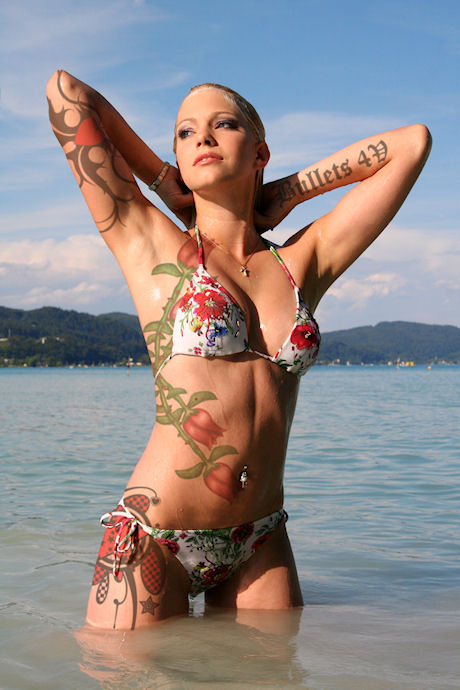
For this tutorial I used the following stock photos. The girl in the bikini at the beach can be found at http://www.sxc.hu/photo/921229.
The tattoo’s I used can be downloaded at the following url’s.
The Stars – http://rene2shae.deviantart.com/art/My-Tattoo-49336516
The Big Roses -Â http://pralinkova-princezna.deviantart.com/art/Flower-designs-100655634
Tribal Heart -Â http://sketch-parody.deviantart.com/art/Tribal-Tattoo-Design-2-61877721
Digital Tattoo Video Tutorial
Steps used in the video.
1. Open up the photo that you will be adding the tattoos to, create a duplicate layer and then move it to
the side for now.
2. Grab some tattoo artwork. Preferably artwork with a white or solid background so you won’t have to do so much cutting out.
3. REMOVING THE WHITE BACKGROUND
*Duplicate the tattoo artwork layer and then toggle off the visibility of the background layer. Next, select the copy of background layer. Then select the magic wand.
*Magic Wand settings*
Mode = Replace
Match Mode = RGB Value
Tolerance = 20
4. Using the Magic Wand select the white/background areas while holding SHIFT and then press ‘Delete” to remove.
5. Now that the background is removed, select Edit > Copy.
6. Back to the photo subject. Create a new Raster Layer by right clicking on the ‘copy of background‘ layer and selecting New Raster Layer. Rename the layer to ‘tattoo1’
7. Next, select Edit > Paste as New Selection, to paste in the tattoo artwork on our new Tattoo1 layer.
8. Press ‘D’ on your keyboard to pull up the deform tool. Rotate and adjust the size and location of the tattoo.
9. Once the tattoo is in place lower the opacity to about 15 percent.
10. Select the Freehand Selection Tool.
*Selection Type = Point to Point
*Mode = Replace
Follow the contour of the body, and remove areas that covers the clothing,etc.
11. Once you have the area selected that you want to remove press ‘Delete’ on your keyboard. Repeat this process until you are satisfied.
12. Still on tattoo1 layer go to Adjust > Blur > Gaussian Blur. Set the Blur Radius to 1.
13. Next, set the blend mode of the tattoo1 layer to Multiply. Then lower the Opacity to around 55 percent.
14. Just repeat the process to add as many tattoos as you like. You can
also use your text tool to make text tattoos.
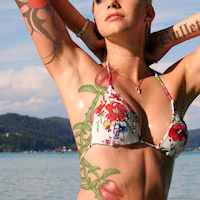
Before & After Results
14 Responses
nicee i had done this before too!
Your Tutorials Are Really Good
I Did This And It Looked So Cool
x
Propa amazed by this work, thanks a lot 🙂
Thanks alot ! I love reading your tutorials, all thought they usually take me forever lol they are still so amazing and so helpful! You should really make a tutorial on how to remove tattoos that are already on peoples’ skin ! that would be greattt ! Thanks for everything !
I couldn’t get it to work. I must be doing something wrong? I end up with a dotted outline of the tattoo but no actual image.
The technic you intoduced works well
Please keep on making tutorial videos
and share your knowledge with us
thank you.
wow! very nice article and easy instructions to follow..
Really great work 🙂 Unfortunately when I try and “paste as new selection” it says “clipboard does not contain any visible data..” 🙁
Any ideas would be greatly received x
@David wingate make sure you have pressed CTRL + A or select all, otherwise you’ve most likely only selected the transparent bits of the tat that you deleted
thankyou for the tut! looks wicked!
great tutorial, thanks for sharinf, take care jo
This was such a great tutorial. I LOVE IT! Thank you!!!!!!!!!!!!!!!!!
Awesome! I did this and it looked awesome so i got a tattoo!
hello
I am a French fan, you have inspired me and I am now a few years and you’re doing a great job thanks to you I found a passion “retouched photos” I wanted to know if it was possible that you replace your old videos on youtube?
cordially
Thanks, I am in the process of redoing them all in HD in X4 and X5.