
In this tutorial we will add some cool retro effects to your photos using Paint Shop Pro.
During this 13 steps tutorial you will learn about applying gradients, creating custom brushes, the mesh warp tool, the deform tool, layer grouping, and blending layers using blend mode. This tutorial was inspired by a Photoshop tutorial called Mix Cool Retro Curves Into Your Photographs found at http://www.psdtuts.com. While the techniques used to achieve this retro effect are somewhat different for Photoshop vs Paintshop, the final results are very similar.
The free stock images used in this demonstration can be found at the following url’s:
http://www.sxc.hu/photo/876777
http://www.sxc.hu/photo/982364 (no longer available) Here is a similar texture that you can use to achieve the same result http://www.sxc.hu/photo/1388409. Alternatively, you can just search for “grunge textures” or “paper textures.”
I have also attached a sped up Youtube video of me creating this effect that you can also use a reference.
Video Preview
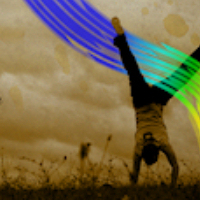
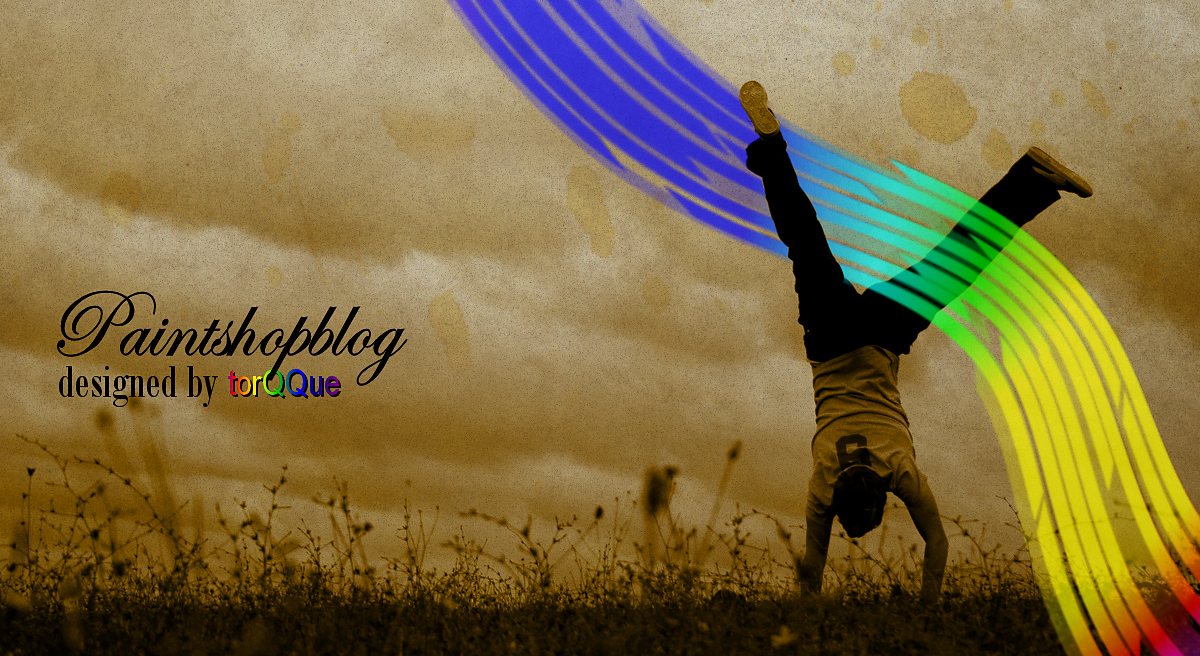
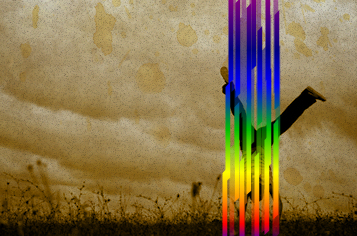
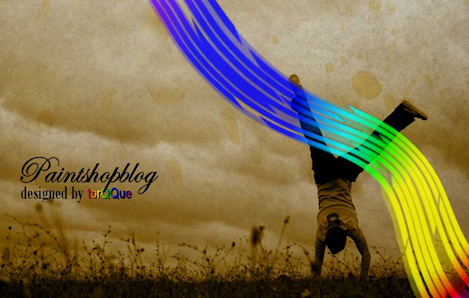
Final Preview
Step 1
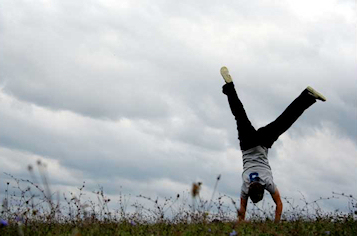
Download the following image at
http://www.sxc.hu/browse.phtml?f=download&id=876777. Once downloaded, open it up in Paint Shop Pro (PSP)
Step 2
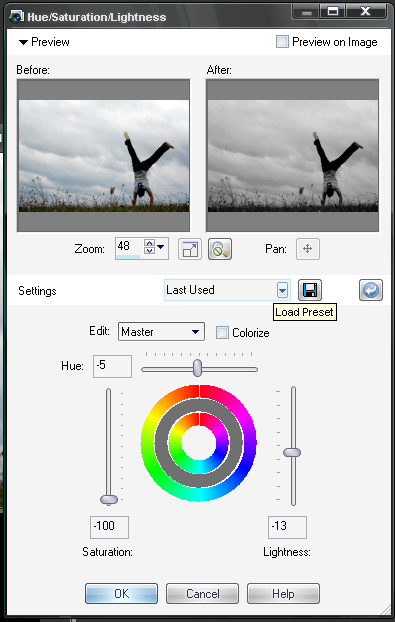
Go to Adjust > Hue and Saturation > Hue/Saturation/Lightness (or just press Shift + H) and apply the settings in the image below to convert the photo to Black & White.
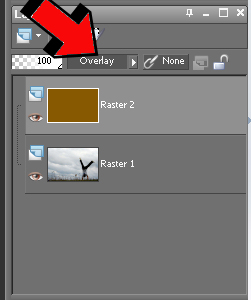
Step 3
Create a new raster layer and name it Brown Overlay. Next, Flood Fill this layer with (#875901), and set the Blend Mode to Overlay as seen the following image.
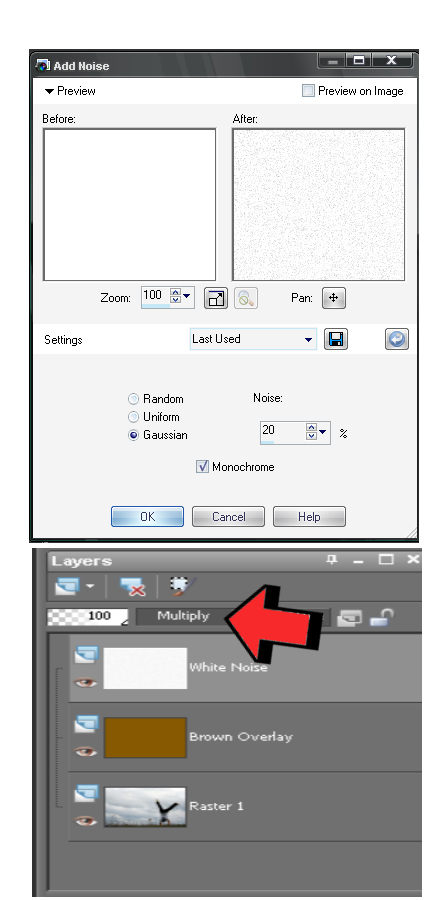
Step 4
Create another raster layer, and name it White Noise. Flood Fill this layer with (#ffffff) and set the Blend Mode to Multiply. Now, go to Adjust > Add/Remove/Noise and apply the Add Noise settings as seen in the following photo.
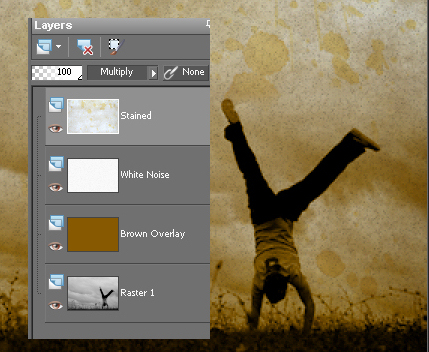
Step 5
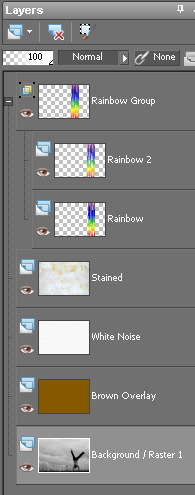
Create another raster layer, and name it Stained. Then, download the following stained image at http://www.sxc.hu/browse.phtml?f=download&id=982364 and open it up in PSP. Right click on the stained image and select Copy. Make sure the layer named stained is selected, and then go to Edit > Paste as new Selection to paste the image of the stained photo in your layers palette. Set the Blend Mode of the stained layer to Multiply. The handstand photo and your layers palette should look similar to the following images.
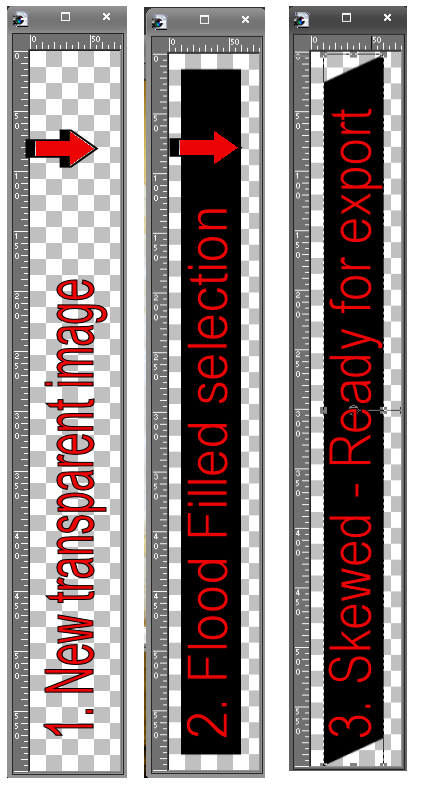
Step 6
Go to File > New Image, and create a new 75 x 600 transparent image (as seen in the photo below). Next, select the Rectangle Selection tool and draw a long skinny bar and Flood Fill it with (#000000). Now, go to Effects > Geometry Effects > Skew and use the settings in the below photo. NOTE: The size doesn’t need to be exact because we can adjust the size to anything we want once we export it to a custom brush. Just aim for a similar shape. Use photos below as a reference. Finally, export the skewed bar you just created into a custom brush. To do this go to File > Export > Custom Brush. Name the brush “skewed bar” or something similar.

Step 7
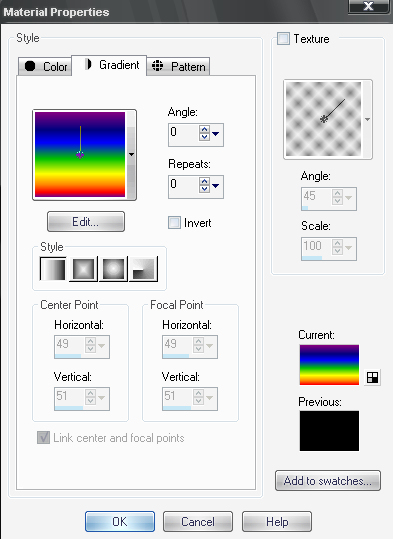
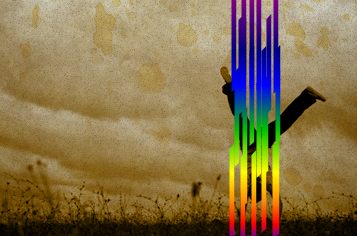
Create a new raster layer named Rainbow. Select your Paint Brush Tool and select the skewed bar brush you just created in the previous step. Next, double click on the materials foreground to pull up the Material properties, and select the Gradient Tab and choose the Rainbow Gradient (See images below for example). Now, paint several lines similar to the image below and the lowerRainbow layers opacity to about 50 percent.
Step 8
Right click on the Rainbow Layer in the layers palette and select New Layer Group. Now, rename the Group Layer to Rainbow Group. Create a new raster layernamed Rainbow 2 inside the new Rainbow Group. NOTE: Grouping the different layers of the Rainbow together will allow us to uniformly apply Deform and Warp effects to all the sub-layers in that particular group. Select the Paint Brush tool again with your custom Skewed Bar brush, then select the Rainbow Gradient we used in the previous step, and paint some more skewed bars in the Rainbow 2 Layer. Don’t lower the opacity any on Rainbow 2, leave it a 100 percent. Apply a Drop Shadow. Go to Effects > 3D Effects > Drop Shadow. Settings: Offset Vertical = 1, Horizontal = 1, Opacity = 75, Blur = 1. (This will give the Rainbow 2 layer bars a little more detail and definition). Your layer palette should look similar to my layer palette below.
Step 9
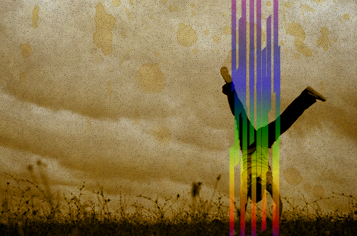
Select the layer in the layers palette named Rainbow Group. Press “D”on your keyboard to pull up the deform tool. Using the deform tool, rotate the Rainbow slightly to the left. You may also need to stretch/scale the Rainbow slightly (adjust your Rainbow until it looks similar to the image below).
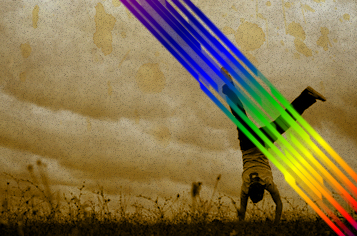
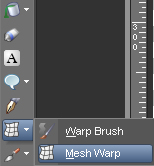
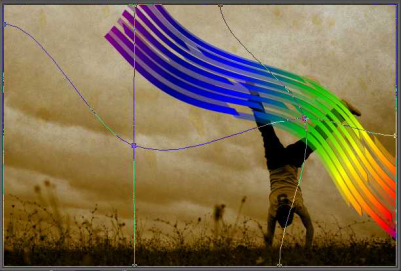
Step 10
With the Rainbow Group selected choose the Warp Mesh brush tool. It is located in the bottom left of your tools toolbar (See photo below). Set the Mesh Horizontal to 2, and the Mesh Vertical to 1. Grab one of the intersecting points on the Mesh by clicking and holding the left mouse button. Move the mesh around until you have created a wave in your Rainbow/retro effect, similar to what is pictured below. HINT: You can also hold shift while selecting a point on the mesh, this will allow you to move the entire line either horizontal or vertical, thus giving you a more uniform warp. Also, holding CTRL while selecting point works the same as holding SHIFT except it will allow you to create somewhat of a symmetric curvature in the horizontal and vertical lines. You can always reset the Mesh by clicking the Apply button, or double clicking a point on the mesh. NOTE: It’s really difficult to explain how to use the Warp Mesh tool If you don’t get it right the first time, don’t worry, just click undo and try again. It takes a few trial and error runs to effectively use the Warp Brush.
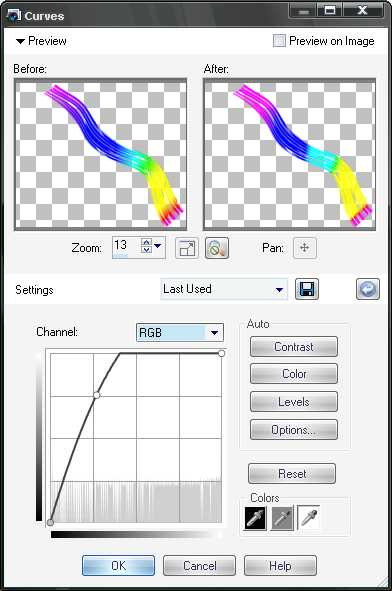
Step 11
Next, with the Rainbow Group layer selected, select Adjust > Brightness/Contrast > Curves and apply the settings in the image below.
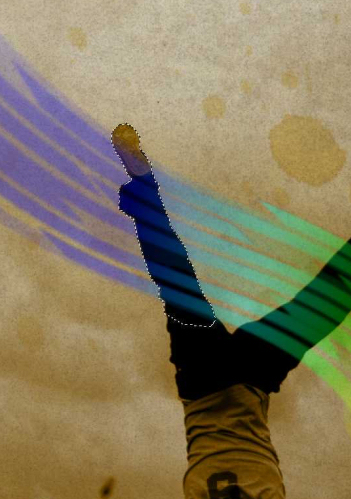
Step 12
Temporarily lower the opacity to around 50 percent of the Rainbow Group Layer so you can see to trace the outline of the leg (See sample below). Select the Freehand Selection Tool and set the mode to point to point mode (or whatever mode you are most comfortable selecting edges with), and outline the edge of the leg. Once you have the leg selected, press “Delete” on your keyboard. This will remove the portion of the Rainbow layer covering up his front leg, thus giving the appearance that the Rainbow is actually going between his legs. Set the opacity of the Rainbow Group back to 100 percent.
Step 13
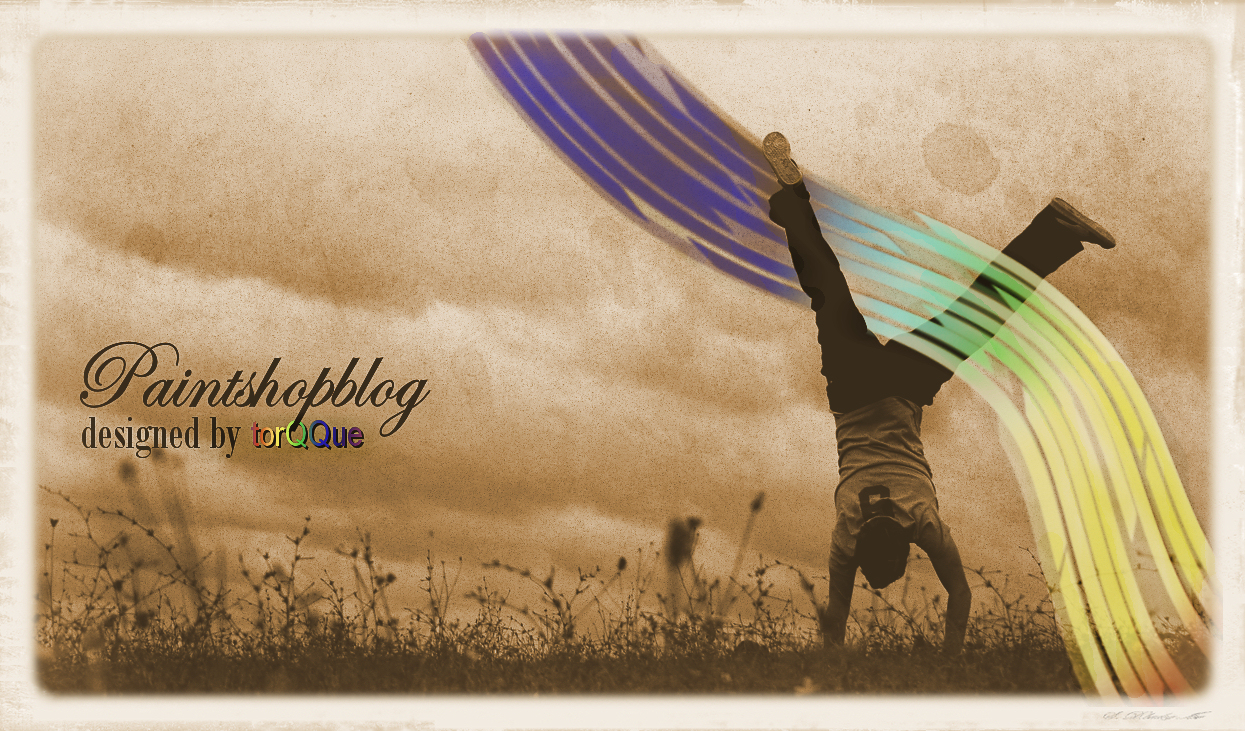
Save your PSPIMAGE so you can keep the layers intact, and make future adjustments. To save the PSPIMAGE, go to File > Save As, and select Save type as: PSPIMAGE. Now that your image is saved, go to Edit > Copy Special > Copy Merged. Then go to Edit > Paste as New Image. Congratulations, you have just finished the tutorial. Are you satisfied with the results? Optionally, you can can crop it, add frames, and/or experiment
with different effects, such as the Time Machine photo effects. I cropped mine and added retro 1965 Time machine effect as you can see below. To add Time Machine effects go to Effects > Photo Effects > Time Machine.
19 Responses
Excellent! Thanks for sharing.
Thank you for this. It took me 2 days but I went thru it and finish. I enjoy all of tutorials. Thanks
Ecellent tutorial!!!
Tnx for helping us out ^^
That was Very easy to follow and I created something close ..Thank you so much for sharing that I loved it..
hello i got stuck on step 5 so if anyone could help me please could you email me on liquidcandy@hotmail.co.uk
How Do You Flood Fill With (#875901) This Colour Where Do You Find It??
Hi there,
I try few times.. but also get ‘stuck’ till Step 8, after I add the ‘drop shadow’ it keep become e.g extra layer on top of the rainbow group. Thats when ‘get wrong’ when I continue when the deform tool and so on… However I try by merge down and manage to get similar result. Just want to learn the exact ‘correct’ way from your tutorial. Thanks to advise if possible . Thank you sir.
Great tutorial (found you through YouTube). There are plenty of techniques to be taken away from this tut. I look forward to attempting them. I’m glad to see there are more and more advanced users surfacing. PSP is a great program. I have used it for MANY years. 7 & 8 being my favorite. I just got X2 for Christmas buthave yet to get my hands dirty with it.
Is there any way for your readers to share their work and discuss? like a PaintShopBlog flickr group or forum?
Thank you Jarrod for these great learning opportunities.
i got stuck on step 5 and 6 can someone help me?
i couldnt do the rainbow thing because for some reason when i tried to make the skewed thing it didnt work :'(
http://www.sxc.hu/photo/982364 has been deleted … do you have a copy?
I don’t, but here is a close replacement. http://www.sxc.hu/photo/1388409
i have also gotten stuck after the skew part. How do you select it to make the custom brush?
thanks
love this i am a biginer with x2 but this was very helpful but i could not download the stained from that web site so i found one similer to it on images off bing
jkdjal – you have to deselect the rectangle and then do it. Make sure you have a transparent background.
LOVE this tutorial, took me an hour or so but I was very pleased with the end effect. You have AMAZING tutorials, thank you for sharing them with all of us.
the stained image did not work for me it said error so I was unable to continue the tutorial please help me because I would like to know what my turn out would be afterwards. thanks
The author of the original image must have removed the link from the gallery. You can used a similar grunge texture such as this one http://www.sxc.hu/photo/1388409 or you can search “paper textures” or “grunge textures”
I couldn’t download the stain from step 5. Help please.
Kathy Stallings – Impressive and awesome pceiurts! Matt & Stevi just when I think you can’t get any better, once again you surprise me!!!! Beautiful couple and lasting memories!!Kathy StallingsKeller, TX