
In this tutorial we will learn how to change hair color using Paint Shop Pro. I have received numerous requests about how to change hair color so it looks natural.
There are many tutorials out there that teach you how to change hair color, however, many of the final results often look unrealistic and unnatural. During this tutorial you will learn how to get that natural look by using Paint Shop Pro’s curves tool. After you complete this tutorial you should be able too easily turn dark hair to blond, blonde to brunette, brunette to red, etc, etc,. As always thanks for stopping by. If you have any questions, or want to provide feedback, feel free to do so in the comments sections.
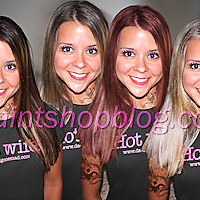
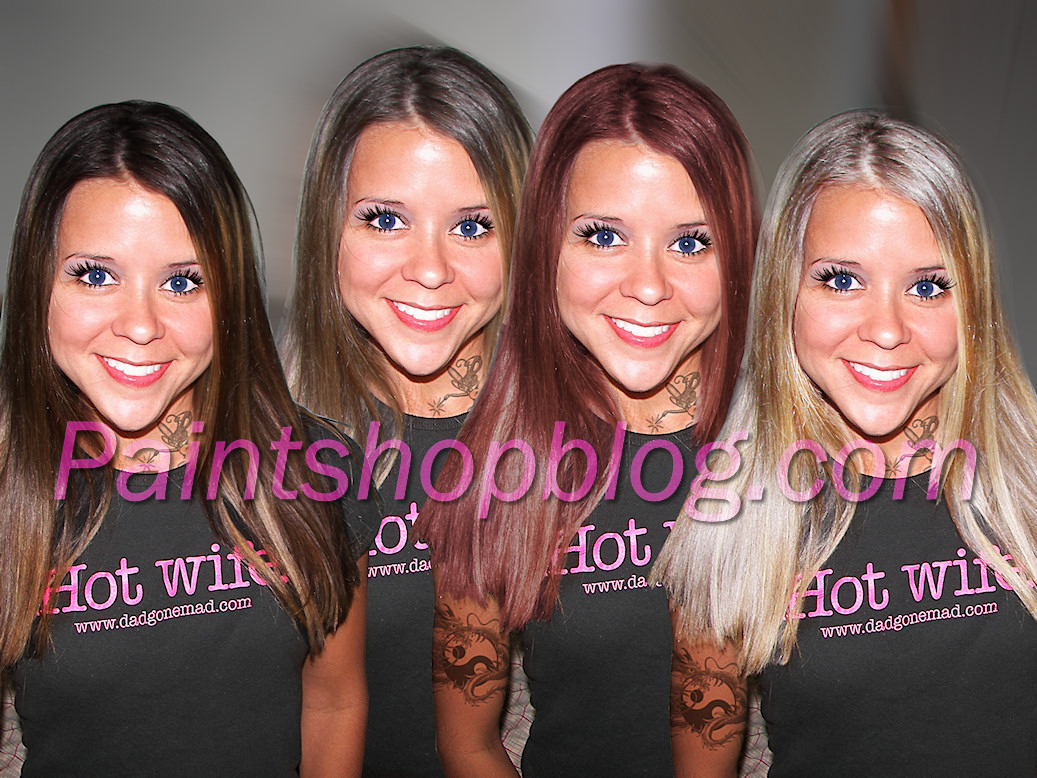
Final Previews
Video Preview
You can use this video as reference if you like. The video is a complete makeover with the same hair change color process used in this tutorial.
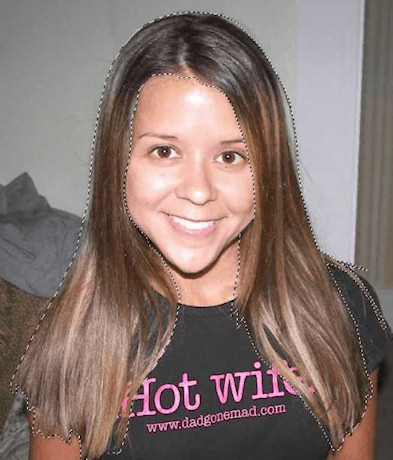
Step 1
Outline the hair using the Freehand Selection tool, and set the selection type to Point to Point (or your preferred selection type).
NOTE: The selection of the hair doesn’t have to be perfect around the ends, just make sure you select it all. We will be using a softened eraser brush later in the tutorial to blend the hair.
Step 2
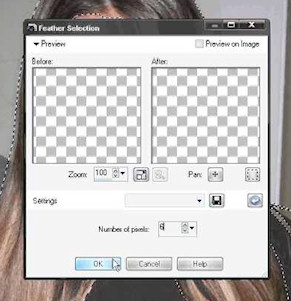
With the selection complete, go to Selections > Modify > Feather, and feather the pixels to around 5 or 6.
Step 3
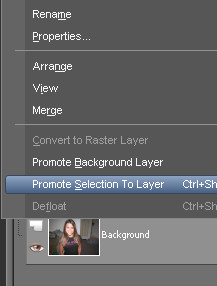
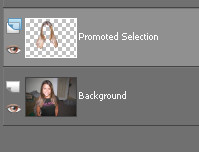
Right Click the background layer in the layers palette, and select Promote Selection to Layer. Now, press Ctrl + D on your keyboard to deselect the selection.
Optional: If you want to experiment later with several different color tones, I suggest duplicating this layer several times. To duplicate a layer just Right Click the “promoted selection” layer in the layers palette and select duplicate.
Step 4
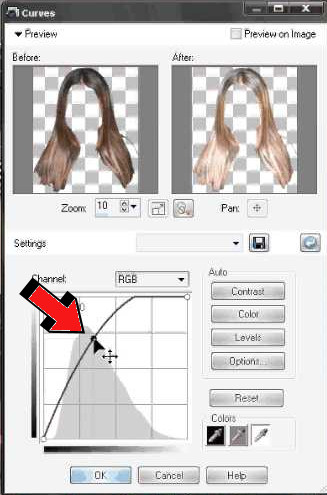
Next, with the “promoted selection” layer selected, go to Brightness & Contrast > Curves. The curves tool essentially allows you to remap brightness values uniformly by placing a point on a curve, and adjusting it accordingly. You can adjust RGB values combined, or individually using the channel drop down box. For this tutorial, we will keep it simple. We will adjust only the RGB channel on the curves histogram. To do this, simply place a point on the in the middle of the curve by left clicking, and slowly drag the curve towards the top left to make the selection lighter. To darken the selection you will pull the point slightly to the bottom right.
Note: The curves method is great for natural colored hair, you can easily turn dark hair to blond hair, or blond hair to dark hair. However, if you want to use more unnatural colors such as Blue, Purple, Green, and Bright Red, I would suggest substituting the curves tool for the colorize tool in this step. To access the colorize tool go to Adjust > Hue & Saturation > Colorize, and adjust the hue and saturation accordingly.
Step 5
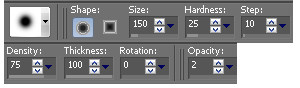
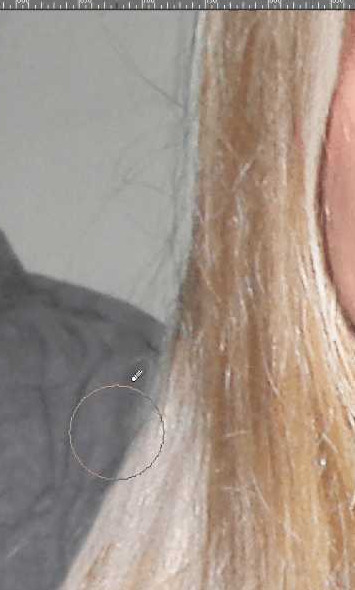
Finally, with the “promoted selection” layer selected, select the Eraser tool and use the following settings in the image below. Make several passes on the hair and the hair edges until it has a natural look. The ends of the hair will probably need several more passes to allow them to blend to the persons clothes, or with the background.
Hint
Experiment by lowering the opacity of the “promoted selection” (hair selection) layer, and/or changing the blend modes types. Also you can duplicate the original selection as I mentioned earlier in this tutorial, and experiment with many different colors and tones.

20 Responses
hello. thank you for teaching this.
its very helpful. can you tell me where to get
eyelash brushes?
i have tired searching it up on the net but they
only tell how to edit the photos witht them not
to download them for free.
can you plese help me.
thank you
Thanks so much! Finally manage to learn how to ‘color’ hairs. Have great fun doing. (wink).
What kind of filters or effect do I use to make it looks like wind in a hair???
Betsy
Hi great tutorials good job, on this tutorial when i use my eraser tool with the settings you provide the hair goes back to dark again, what am i doing wrong? i also have PS CS3 and for some reason i am always using PSP X2 Ultimate i really like it;)
You can download photoshop brushes for free at http://www.obsidiandawn.com/brushes-categories
they have eyelash brushes among others.
I am hoping that someone can tell me where to buy a video that teachs all there is to know about Paint Shop Pro. I am specifically interested in learning how to make layered banners etc.
i still dint get it cuz mine goes kinda white n wierd color and i try to put the eyelashes on but it just pastes the eyelash on n the color.
can u plz tell me how to put the eyelashes on
U canalso use the magic wand tool 4 the hair selection 2!
does the hair have to be selected when doing the curves?? Cuz, mine aint coloring the hair at all.
Wow! Thankyou Ever So Much! Great Tutorial =)
Awesome tut!!!! Only problem im having is after im done there is a slight yellow glow around the hair…any suggestions?
Oh i figured out how to get it out…I just needed to up my opacity a few levels…woohoo!! Thank you for this great tutorial =)
Melody @ Myspace.com/rsdrockz
This tutorial helped loads, it’s awesome. Now I can have fun with changing hair colors.
Thanks for the tutorial. =]
Hi Ya~
Your is the only blonde to dark hair instructions a goggle search finds in a sea of “how to” videos of dark to blonde. It is far more difficult to make a blonde dark haired and make it look real, then going dark to blonde. Thanks for taking the time to post!
Had to tinker a bit with getting good results, because I’m on PS CS3 on a mac and I don’t have the
“Right Click the background layer in the layers palette, and select Promote Selection to Layer.” In fact I could not find “Promote Selection to layer” command anywhere. No matter, again Thank You!
CONGRATULATIONS, IT IS AN AMAZING SITE, I ENJOYED IT VERY MUCH AND I WANT TO THANK YOU FOR SHARING IT WITH US (YOUR PUPILS)
KISSES FROM MEXICO CITY.
How do you put the new hair back on to the picture ?
thanks for the great tutorial. 🙂
Great tutorial. Thank you. I’ve been able to change blonde to any color, I’m having difficulty with changing brunette or very dark hair to blonde. I get close, but it washes out and I lose contrast. Or, it’s too yellow. When comparing to images of blondes, my brunette-to-blonde doesn’t look quite right.
how do you put the new hair back on the picture
Thanks for this tutorial, very helpful!