
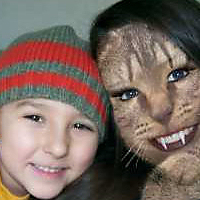
This tutorial will teach you how to create a cat/human hybrid. I know, I know, it’s a weird tutorial. However, my wife loves cats so much, I figured I’d turn her into one:) This tutorial is intended for you to use your own photos.
I will just walk you through the basic techniques for achieving such an effect. Don’t get frustrated if your final result is not perfect. As you can see mine is not perfect either, however, the more I use PSP and the more familiar I become with it, the better my results are.) Your results will also get better each time. It just takes a little practice and patience to become familiar and comfortable using the PSP toolsets. As you become more familiar you will start developing your own techniques. This tutorial is fairly easy; we basically only use four tools during the whole tutorial. The deform tool, the warp brush, paint brush, and selection tools. I hope you have fun working through this tutorial. For this tutorial I used a beautiful photo of my wife and son. The free stock photos used in this tutorial can be found at http://www.sxc.hu/photo/1020254 and at http://www.sxc.hu/photo/453253.
Final Preview
Video Preview
You are also welcome to view this sped up video for reference.
Step 1
Open up a photo you want to transform into a cat/human hybrid. I used the following photo. Once open, create a new raster layer and name it “catface.”
Step 2
Download the following image at http://www.sxc.hu/photo/1020254. Once downloaded open it up in PSP. Optional, download a cat photo of your choice.
Step 3
Using the Rectangle Selection tool, draw a selection around the cats face. Once the selection is complete, go to Edit > Cut. Now, select the catface layer in your layers palette, and go to Edit > Paste as New Selection. Press Ctrl + D to deactivate the selection.
Step 4
Lower the opacity of the catface layer to around 25 percent (This will allow you to see to align the eyes and nose of the cat). Press “D” on your keyboard to pull up the deform tool. Scale, rotate, and shear the cat’s head. Try to line up the eyes, nose, and mouth the best you can. NOTE: The head of the cat doesn’t have to line up correctly with the cheeks, forehead, and chin of the human subject. In the next step we will be removing any part of the cat’s head that exceeds one of those boundaries.
Step 5
Next, turn off or lower the visibility of the catface layer, and select the background layer. Select the Freehand Selection tool using point to point mode and trace the edge of the face. Once the selection is complete, go to Selections > Invert. Select the catface layer and turn the visibility back on, and increase the opacity back to 100 percent. Next, press “DELETE” on your keyboard.
Step 6
Repeat step 5, except this time instead of tracing the edge of the face, trace the edge of the mouth.
Step 7
With the catface layer selected, select the Freehand selection tool using point to point mode and trace each of the cats eyes, pressing “DELETE” after each selection to remove the cat eyes. Your image should look similar to the following image.
Step 8
With the catface layer still selected, select the Warp Brush tool and set it to PUSH mode to align the eye sockets of the catface to human eye sockets. See image below for example
Step 9
With the catface layer still selected, select the Freehand selection tool using point to point mode, and begin drawing a selection around one of the whiskers. Once the selection is complete, go to Edit > Copy to copy the the whisker to he clipboard. Now, begin pasting the whiskers along the natural flow of the cats whiskers by going to Edit > Paste as New Selection, or by just pressing CTRL + E on your keyboard. Repeat this process until you are satisfied with the amount of whiskers you want. NOTE: Each time you paste a whisker you can press the “D” key on your keyboard to pull up the deform tool to align, rotate, scale and sheer the whiskers. See image below for reference.
Step 10
Next, download this fur/fuzz PNG. Once the PNG files is downloaded open it up in PSP, and export it to a custom brush named “furfuzz.” To export a brush go to File > Export > Custom Brush. Make sure you Right click and save the PNG image to your computer before opening in PSP. I say this because many people will copy and paste files directly from the web to PSP. That process doesn’t always work well with PNG files. Alternatively, you can draw your own using a transparent background.
Step 11
Using your Rectangle Selection tool select a small area of fur on your catface layer. Select Edit > Copy, then go to Edit > Paste as new Image. Note, we pasted this as a new image because we are going to use it as pattern in the next step to paint fur on the edge of your cathuman hybrid, to give it a more realistic look. Any open image in your work area is automatically stored in the patterns clipboard, and can be used as a pattern.
Step 12
Select the Paint Brush tool, and select the furfuzz brush you exported earlier. Next, double click the Materials Foreground to pull up the Material Properties. In the Material Properties, select the Patterns tab, and select the small image of the fur that you created in the previous step. Now, begin painting fur around the edges of the face on the catface layer. Note: Rotate the brush as you paint around the edge to create a more natural looking flow of hair.
Step 13
Select the background layer and grab the Freehand Selection tool, select one of the teeth. Once the selection is complete, right click the layer, and select Promote Selection to a Layer. Then select the Warp Brush Tool set to Push mode and push & mold each tooth into a fang shaped tooth. Repeat the the process for the other tooth. See sample image below.
Step 14
Lower the opacity of the catface layer to around 85 percent (or whatever you desire) to allow some of the human face detail & contour to show through the fur. Notice in the image below how you can faintly see the eyebrows through the fur.
Step 15
Save your PSPIMAGE so you can keep your layers intact in case you want to make future adjustments. Once you are satisfied with your results go to Edit > Copy Special > Copy Merged, and then go to Edit > Paste as a New Image. You have successfully completed this tutorial!
Hint:
If you would like to do further enhancements to your cat/human hybrid such as adding eyelashes or changing eye color. You can refer to that tutorial by clicking this link. Also if you would like to add fur to the neck area of your photo subject, you should be able to easily apply the steps used in this tutorial to accomplish that. Remember: You don’t have to use a cat. You can experiment with different animals using the same techniques in this tutorial. I went ahead and created a mouse/human hybrid of my son. See image below.
11 Responses
You look GREAT EXCEPT that the FANGS should be on the CANINE teeth.(One more tooth OUT on each side!
debbiegirl (on Twitter)
requesting a “following” if you’d like
^LOL Debbie.. You can tell I’m not a cat expert. I got her looking like a vampire.
Wow, I am impressed. You are very imaginative, I could probably do what you did, but I never would have thought of it or of how to do it. Thanks for the tutorial, now I’ll have to see if I can turn my fiance’s little boy into a wolf (he and I both love them)!
You can find the image here:
http://www.sxc.hu/browse.phtml?f=view&id=1053938
(the link you have at the moment directs to an older version which i have deleted from sxc)
very nice tutorial, BTW.
Will update the link in the post.
hi urs blog(or website)is so wonderful!!
i almost did eveything eccept cybor boy when i cut out the mother board to paste on the selected area it doesnt adjust, it doesnt get place on it .and i have a question do u know how to conver black & white pictures to colors? ok i gotta go take care ur family bye see you later
hi my name is wolfy
i do not how do cat photomorph cna you tell me how it work or what your e-mail ?
Wolfy
I thought it was cool. I want to do that sometime, but I don’t have Photoshop…I’ll look for it and install it. Then I’ll do this.
i think the process is too complicated!! Can anyone make me a hybrid out of 2 pic i give him/her??
That’s so cool!!!!!
I mean if I were to do that, my friends would freak out. So, lets say I was behind the door and when my sister goes to shut it, she will SCREAM!!!:)
sweet!!’