
Here is a fun tutorial that your kids are sure to enjoy. In this tutorial I will teach you how to create a basic clown with Paint Shop Pro using a photo of your kids, relatives, or even yourself. This is my first attempt creating a clown, and it’s far from perfect.
I got the idea from viewing the “clowning around” gallery over at worth1000.com It’s no where near as good as the clown makeovers you see over at worth1000. However, some of those guys/gals have superb editing skills that I simply can not re-create at this time. Anyway, I think this clown tutorial is sufficient enough to at least get one started in the right direction of creating basic clown makeovers. For this tutorial, I used a beautiful photo of my youngest son, Greyson. You can download the entire pspimage of this tutorial, for reference, by clicking here.
Youtube Video
You are to welcome to use the Youtube Video as a reference. I will post the video once it’s uploaded to the Youtube servers..
Step 1
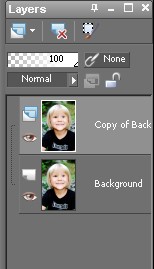
Open up your photo subject and Duplicate the background layer. Select the copy of background layer and use the Freehand Selection tool (point to point) to outline the face. Once the selection is complete promote the selection to a layer by right clicking on the copy of background layer and selecting Promote Selection to a layer. Next, select the Promoted Layer and rename it white face. Now, go to Effects > Artistic Effects > Halftones and use the halftone settings in the photo below to create the white makeup effect. Set the opacity to around 70. NOTE: you can increase/decrease the opacity depending on how much white makeup you want.
.jpg)
.jpg)
.jpg)
.jpg)
.jpg)
Step 2
With the white face layer selected, outline the left eye using the Freehand Selection tool (point to point). Once you have the left eye outlined, hold SHIFT and outline the right eye. Next, press Delete on your keyboard to reveal the eyes. Finally, with the eye selections still active go to Selections > Load/Save Selections > Save Selection to Alpha Channel. Name the Alpha channel to eyes outline and click Save.
.jpg)
.jpg)
.jpg)
Step 3
With the white face layer selected, outline the mouth using the Freehand Selection tool (point to point). Once you have the mouth outlined, press Delete on your keyboard to reveal the mouth.
.jpg)
.jpg)
Step 4
With the white face layer still selected, select the eraser brush and use the settings similar to the image below. NOTE: Your brush size will vary depending on the size of the image you are working with. You want to use a large eraser brush, with a low hardness and low opacity settings so you slowly blend the edges of the white makeup.
Slowly brush around the edges of the face until you achieve a realistic looking blend. It may take several passes of the eraser brush to get a realistic looking blend. Remember, to make numerous brush strokes so you can easily Undo any mistakes. I also brushed away some of the white around the nose and mouth to allow more of the facial features to show through.
.jpg)
.jpg)
.jpg)
.jpg)
Step 5
Create a new Raster Layer. Select the new raster layer and then select the Preset Shape tool by pressing P on your keyboard. Set your materials foreground to black, and set the materials background color to whatever color you want the eye makeup to be filled with. I used a green color for the left eye, and then a yellow color for the right eye. Next, set your Preset Shape Tool settings to the settings you see in the last image of this step.
.jpg)
.jpg)
.jpg)
.jpg)
Step 6
Select the Star Preset Shape, or a shape of your choice, and draw the shape over the left eye. Position the left eye shape into place. Next, draw the shape over the right eye, and position it into place as well. NOTE:: You can use the vector selections nodes to resize and rotate. The nodes are displayed immediately after you draw the shape. Once the shapes are in place, right click on the the vector layer and select Convert to Raster Layer. OPTIONAL: After you convert the shapes to a raster layer you can use the Warp Brush Push to further align, mold, and/or just create some distortion in the shapes. Next, rename the layer to Eye Makeup, set the blend mode to multiply, and the opacity to around 45. Finally, go to Selections > Load/Save Selections > Load Selection from Alpha Channel and select the eyes outline selection, and then press Load. With the eyes selection outline loaded, press Delete on your keyboard to reveal the eyes.
.jpg)
.jpg)
.jpg)
.jpg)
.jpg)
.jpg)
.jpg)
.jpg)
Step 7
Next, create another new Raster layer and select it. Now, select the Ellipse Tool by pressing Q on your keyboard. Set the Materials Foreground to Black and the Materials Background to a Red color(or color of your choice). Draw the ellipse over the mouth area and position it into place. Once the ellipse shape is in place, right click on the the vector layer and select Convert to Raster Layer. Now, rename the layer to Mouth Makeup, set the blend mode to multiply, and the opacity to around 45 or so. Next, select the Warp Brush tool and set the mode to push. The size of the warp brush should be rather large so that when you shape the mouth makeup you get uniform transformation. Warp push the shape until it looks similar to the photo below.
.jpg)
.jpg)
.jpg)
.jpg)
.jpg)
.jpg)
.jpg)
.jpg)
Step 8
After you completed warping the Mouth Makeup layer, go ahead and select the Freehand Selection tool (point to point) and outline the teeth of the mouth makeup layer. Once the selection is complete press Delete on your keyboard to reveal the teeth.
.jpg)
.jpg)
Step 9
Create a new Raster Layer and rename it Hat. Download this stock photo of boy dressed up like a clown. The little boy is wearing a nice clown hat we can use. Using the Freehand Selection tool (point to point) draw a selection around the the Hat. Once the selection is complete go to Edit > Copy. Next, select the Hat layer, and then go to Edit > Paste as New Selection to paste in the clown hat. Press ‘D’ on your keyboard to pull up the deform tool to resize and move the hat into position. Use the Warp Brush Push tool again to push the edges of the hat over the hair and around the back of head to give the appearance that he is really wearing the hat. Next, select the Eraser brush using a opacity of 10 to slowly brush the hat to reveal some of the hair.
.jpg)
.jpg)
.jpg)
.jpg)
.jpg)
.jpg)
Step 10
Create a new raster layer and rename it Red Nose. Draw a selection around the nose using the Freehand Selection tool (point to point). Then Flood Fill the selection with a red color, and then lower the opacity to around 17. Select your eraser brush, and set the opacity of the brush to around 5. Slowly brush the edges of the red nose layer to blend it in.
.jpg)
.jpg)
.jpg)
.jpg)
Step 11
Create a new Raster Layer and rename it Bow Tie. Find a photo of a bow tie. I used this photo from a tie store. Use the magic wand to remove the white background. Optionally, you can cut out the bow tie with the Freehand Selection tool. Once the background is removed go to Edit > Copy. Next, select the Bow Tie layer and select Edit > Paste as New Selection. Again, Press D on your keyboard to pull up the deform tool to resize and move the bow tie into position.
.jpg)
Step 12
Temporarily toggle off the visibility of the Hat layer. Select the copy of background layer and outline the hair using the Freehand Selection tool (point to point). Once the selection is complete, right click the copy of background layer and select Promote Selection to layer. Next, rename the the Promoted Selection Layer to Original Hair. Now, Duplicate the Original Hair layer 3 times by Right Clicking it, and selecting Duplicate. Select the duplicate layers one at a time, and then colorize them. To colorize the layer go to Adjust > Hue/Saturation > Colorize. If you want to use the exact colors I did, use the colorize settings in photos below. Once you colorize a layer to a specific color rename that layer to reflect that color.
Now, select the highest/topmost layer of your colorized hair layers. Select a somewhat large eraser brush with an opacity setting of 10 or less, and slowly brush away random areas of that specific layer. You will notice the color of the hair layer directly underneath beginning to show through. Next, drop down to the hair layer directly underneath, and erase random areas of that layer to reveal color from layer underneath it. Repeat the process for all the colorized hair layers. You can go back and forth between the colorized layers brushing away certain areas until you are satisfied with the amount of coloration in the hair.
.jpg)
.jpg)
.jpg)
.jpg)
.jpg)
.jpg)
.jpg)
.jpg)
Step 13
Now, that you got a good mix of coloration in the hair go ahead and merge them into one layer. To merge them simply select the highest/topmost colorized hair layer, right click it, and then select Merge > Merge Down.
Repeat until all three of the colorized hair layers are merged. Once they are all merged, rename the layer to Merged Hair Colors. Next, select your eraser brush and set the opacity setting to around 10 and brush the edges of the Merged Hair Layer to blend with the Original Hair Layer.
.jpg)
.jpg)
.jpg)
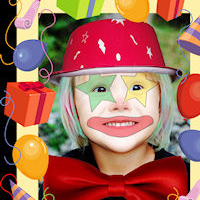
Final Results
I hope you enjoyed working through this tutorial. BTW, if you would like to add a picture frame like below, go to Image > Picture Frame. I just used a couple of the default Picture Frames that come bundled with Corel Paint Shop Pro X2. Also, the different eye makeup is from either using different preset shapes and/or warping the star shape with the warp brush, as mentioned in the step 6 note.
.jpg)
.jpg)
.jpg)
4 Responses
nice when i go to that level of creativity it takes like 3-4 house to create sch thing…
[…] To get started on creating your own mini cute clown visit Paintshopblog.com They give step by step instructions on how to create this very image. Visit How To Create A Clown Makeover Using Paint Shop Pro. […]
when i go to that level of creativity it takes like 3-4 house to create sch thing…
Thanks I really enjoyed doing this, i missed out the hair part but it still looked great.
Thanks a lot!