

In this tutorial we are going to learn how to create a logo using Corel Paint Shop Pro X2. We are going to build an ATI logo from scratch. Many of the techniques used in this tutorial can also be applied when creating desktop backgrounds, dvd covers, book covers, magazines, etc. I got this tutorial idea from
the “Making the ATI LOGO photoshop tutorial” over at eyesontutorials.com. Be warned, this is a long, but very easy tutorial with many illustrations and detailed steps necessary to complete it. Maybe experienced users will probably think I went overboard? However, I remember when I first started using Paint Shop Pro many of the tutorials left me asking questions, or not knowing exactly how to complete a task. My goal with this tutorial is to familiarize newcomers to the Paint Shop Pro X2 tools and its functionality. I took a no shortcuts approach (many things are repetitive), but I assumed the reader is completely new to Paint Shop Pro X2. The actual logo took me less than 30 minutes to complete, however, the tutorial took me nearly a day and half to put together. Paint Shop Pro veterans should be able to complete this just by looking at the layer structure. We will be working with multiple layers, several gradients, warp mesh, blend modes, grids, rulers, alpha channel masks, text, brush strokes, flood fill, move tool, and deform tool. I hope you all enjoy and find this creating a logo in Paint Shop Pro X2 tutorial useful. Thank you for visiting paintshopblog.com.
Preview


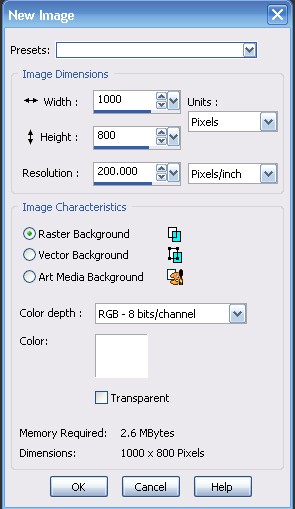
Step 1
Create a new 1000×800 image with a white background. File > New.
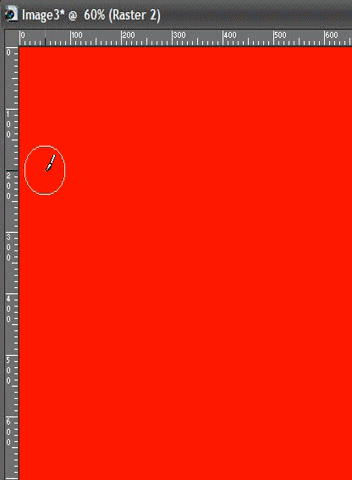
Step 2
Right click the background layer in the Layers Palette and choose New Raster Layer. Flood Fill this new layer with #fd0002 and then rename the layer to Red Background.
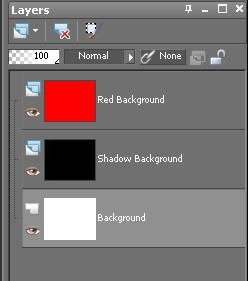
Step 3
Right click the background layer in the Layers Palette and choose New Raster Layer. Flood Fill this new layer with #000000 and then rename the layer to Shadow Background. Your layers palette should look like the image below.
Step 4
Create a new raster layer and rename it Brush Stroke. Next, go to View and activate Rulers or press (Ctrl+Alt+R). This places a ruler with the number pixel units available on the image you are working with. You should see 1000 units across the top (width), and 800 down the left side (height). This will allow you to measure the size of your brush strokes and it will assist you with making straight brush strokes and alignments. I almost always work with rulers activated.
Step 5
With the Brush Stroke layer active select your Paint Brush (Press ‘B’). Select a round brush and set the brush settings as seen in the image below.
.jpg)

Step 6
Using the ruler as reference, paint a straight line approximately 325 pixels high. To do this, align your cursor to the left of the 200 pixels mark (height), and 50 pixels mark on the width. Click the left mouse button one time and then let go. You should see one circular brush stroke. Now, press and hold down shift. While holding shift move your cursor down to the 525 height mark and and align with the 50 width mark, then left click the mouse button again. This will create a perfectly straight brush stroke assuming you aligned the ruler at 50 pixels on each click. See animated gif below for example.
Step 7
Next, duplicate the Brush Stoke Layer 4 times. See image below for example. The 4 duplicates are currently stacked on top of each other and we can’t see them. We need to bring them into view using the Move tool (Press ‘M’) . Start at the top (moving each stroke right) of the 4 Copy of Brush Stroke Layers and work your way down until all 5 brush strokes are in view. Your image should look similar to the image below.
.jpg)
.jpg)
Step 8
Use the image below to rename the Copy of Brush Stroke Layers to match.
.jpg)
Step 9
Turn off the visibility on the Letter I and Letter A layers.
.jpg)
Step 10
Now, select the Letter T Top Layer and press ‘D’ on your keyboard to pull up the deform tool. Use the deform tool to rotate/move the Stroke to form the top of the T. If you need to, you can turn on the Grids to help you get a straight alignment. View > Grids (Ctrl+Alt+G). Once the top of the T is aligned, right click the Letter T Top layer and select Merge > Merge Down to merge the two strokes into one Layer. Once merged rename the Layer to Letter T.
.jpg)
.jpg)
.jpg)
.jpg)
.jpg)
.jpg)
Step 11
Turn off the visibility for the Letter T Layer, and turn ON the visibility for the two letter A layers. Next, select the Letter A Left layer and press the ‘D’ to pull up the deform tool. Rotate and move the stroke into place to form the A. Still using the deform tool, scale the length of the stroke until it is even with the other side of the A. Use the Grids or Guides again to get the bottom of the A even. Once aligned, merge the two A layers together and rename the layer to Letter A.
.jpg)
.jpg)
.jpg)
.jpg)
.jpg)
.jpg)
Step 12
Turn ON the visibility of all layers. Use the Move tool (Press ‘M’) along with the Grids to align, create spacing, and center each letter. Once aligned, merge the three letters into one layer named ATI.
.jpg)
.jpg)
.jpg)
.jpg)
.jpg)
Step 13
Select the ATI layer and select the selection tool (Press ‘S’). Next press Ctrl+A (this will select the entire layer) and a selection marquee will appear around the entire layer. With the marquee active left click anywhere inside the layer. This will cause the selection to wrap around the object in that layer.
.jpg)
.jpg)
Step 14
With the selection marquee still active around the ATI letters, go to Selections > Load/Save Selections > Save Selection to Alpha Channel. Save the Alpha Selection as ATI outline. Press Ctrl+D to deselect. Then turn OFF the visibility of the ATI layer.
.jpg)
.jpg)
Step 15
Select the Red Background layer. Then go to Selections > Load/Save Selections > Load Selection from Alpha Channel. Select the ATI Outline and click Load. The ATI selection outline will load. Once loaded press “Delete” to cut a selection in Red Background. Press Ctrl+D to deselect.
.jpg)
.jpg)
.jpg)
.jpg)
Step 16
Select the Shadow Background layer. Then go to Selections > Load/Save Selections > Load Selection from Alpha Channel. Select the ATI Outline and click Load. The ATI selection outline will load. Next, go to Selections > Modify > Contract and contract the selection to 1 pixels. Next, press “Delete” to cut the selection from the Shadow Background. Press Ctrl+D to deselect.
.jpg)
.jpg)
.jpg)
.jpg)
.jpg)
Step 17
With the Shadow Background layer selected go to Adjust > Blur > Gaussian Blur and set the Radius to 4 or 5 and press OK. Temporarily turn off the visibility of the Red Background Layer. Next, use the Move tool to move the Shadow Background slightly to the right and down. Turn the Visibility of the Red Background Layer to view the results. You may have to adjust/move the Shadow Background a couple times to get it aligned properly.
.jpg)
.jpg)
.jpg)
.jpg)
.jpg)
.jpg)
Step 18
Create a new raster layer and name it Graphics Box. Select the Selection Tool and set the selection type to Rectangle. Next, draw a selection starting on the 650 pixel mark (height) and extend it all the way down and across. Flood fill the selection with Black #000000. Press Ctrl+D to deselect. Draw another rectangle selection over top of the black except this time start at 652 pixel mark. Leave the selection active.
.jpg)
.jpg)
.jpg)
Step 19
Set the foreground to #c0c0c0 and the background #ffffff in the materials palette. Next, double click on the foreground color to pull up the Material Properties. Within Material Properties select the Gradient Tab. In the gradient selection drop down, select the foreground-background gradient. Make sure Invert is checked, and set the gradient style to Sunburst. Then Flood Fill (Press ‘F’) in the Graphics Box selection we made. Press Ctrl+D to deselect.
.jpg)
.jpg)
.jpg)
.jpg)
.jpg)
.jpg)
.jpg)
.jpg)
Step 20
Create a new layer named Circle 1 A. Select the Selection tool and set the selection type to circle. Draw a small circle under the A, and then Flood fill with #ffffff. While the selection is still active, right click the Circle 1 A layer and select duplicate. Flood fill the duplicated circle layer with #000000. Next, go to Selections > Modify > Contract, and contract to 3 pixels. Press ‘Delete’ to remove the inner black of the circle. Now Press Ctrl+D to deselect.
.jpg)
.jpg)
.jpg)
.jpg)
.jpg)
.jpg)
.jpg)
.jpg)
Step 21
With Copy of Circle 1 A layer still active go to Adjust > Blur > Gaussian Blur and set the radius to 2. Next, draw another circle selection over top of the blurred black ring and position it like in the photo below. Finally, Press ‘Delete’ and merge the Copy of Circle 1 A layer with Circle 1A. To do this simply right click the Copy of Circle 1 A layer and select merge down.
.jpg)
.jpg)
.jpg)
Step 22
Create a new raster layer named Circle 2. Next, select the Selection tool and set the selection type to circle. Draw a small circle at the top of the I, and flood fill it with #fd0002. Next, Go to Effects > 3d Effects > Drop Shadow and use the settings in the image below. Press Ctrl+D to deselect.
.jpg)
.jpg)
.jpg)
Step 23
Create a new raster layer named Trademark. Set the Foreground and Background in the Materials Palette to #ffffff. Select the Text Tool (Press ‘T’), set the font to Arial Black, the size to 36, and the units to pixels. Then type in an uppercase ‘TM’
.jpg)
.jpg)
.jpg)
Step 24
Create a new raster layer named Overlay. Set the foreground to #000000 and the background #000000 in the materials palette. Next, double click on the foreground color to pull up the Material Properties. Within Material Properties select the Gradient Tab. In the gradient selection drop down select the fading-background gradient. Make sure Invert is NOT checked, and set the gradient style to Linear. Then Flood Fill (Press ‘F’) in the Overlay Layer.
.jpg)
.jpg)
.jpg)
Step 25
With the overlay layer selected press ‘M’ on your keyboard to pull up the Move tool. Use the move tool to drag the gradient down. See photo below for example.
.jpg)
.jpg)
Step 26
With the Overlay layer selected, select the Warp Mesh Tool. Set the Mesh Horizontal to 1 and the Mesh Vertical to 1. Grab the center node and drag straight down like in the photo below. Lower the opacity of the Overlay layer to 30.
.jpg)
.jpg)
.jpg)
.jpg)
.jpg)
Step 27
Select the Graphics Box Layer and drag it to the top in the Layers Palette.
.jpg)
Step 28
Create a new raster layer and name it Graphics Box Text. Set the Foreground and Background in the Materials Palette to #ffffff. Select the Text Tool (Press ‘T’), set the font to Arial Black or your preferred font (I used a font called Cacaphony Loud), set the size to around 140, and the units to pixels. Then type in a uppercase ‘Graphics.’ Use the grids to center the text.
.jpg)
.jpg)
Step 29
Create a new layer and name it White Warp Overlay. Next, select the selection tool using a circle selection type. Draw a circle selection like in the image below. Now, set the foreground to #ffffff in the materials palette. Next, double click on the foreground color to pull up the Material Properties. Within Material Properties select the Gradient Tab. In the gradient selection drop down select the fading foreground gradient.Make sure Invert is NOT checked, and set the gradient style to Linear. Then Flood Fill (Press ‘F’) the circle selection. Press Ctrl+D to deselect.
.jpg)
.jpg)
.jpg)
Step 30
Next, go to Image > Canvas Size and increase the canvas size to 2000 x 1600 (double the original size). This will allow us to make smoother curves when we warp this overlay. Now, open the Mesh Warp tool and set Mesh horizontal to 7, and the Mesh Vertical to 4. Adjust/pull the mesh nodes until they look similar to the image below. Now, press ‘M’ to pull up the move tool and drag the warped overlay toward the top some. Next, select the Mesh Warp tool again and make final adjustments on the layer. See image below as to where to place the mesh nodes. Set the blend mode to Screen and lower the opacity to around 25. Now, return to
Image > Canvas and decrease the size back to the 1000 x 800(original size). Finally, go to Selections > Load/Save Selection > Load Selection from Alpha Channel and load the ATI Outline. Once loaded, press ‘Delete’ to remove any of the white warp overlay that may be overlapping the ATI letters.
.jpg)
.jpg)
.jpg)
.jpg)
.jpg)
.jpg)
.jpg)
.jpg)
.jpg)
.jpg)
.jpg)
Step 32
This step is optional. I wanted to add more effects/graphics to the red background. For this step create a new layer named Technology Graphics right below the Trademark layer. Download this image http://www.sxc.hu/photo/1206711, or an image of your choice and open it up in Paint Shop Pro X2. Resize it to 1000×800 by going to Image > Resize. Next, go to Edit > Copy to copy the image to the clipboard. Now, with the Technology Graphics layer selected, go to Edit > Paste as New Selection. Set the blend mode to Luminance and the opacity to around 40 or 50. Once again load the ATI Outline from the alpha channel. Once loaded press ‘Delete.’ Press Ctrl+D to deselect. Finally , draw a circle selection around the Circle layers and press ‘Delete’ then Ctrl+D to deselect.
.jpg)
.jpg)
.jpg)
.jpg)
.jpg)
.jpg)
.jpg)
Final Results
8 Responses
Very detailed and extremely helpful. Thank you!
We really like your blog and all these tutorials. You are the only we know who does great tutorials using Paintshop. We will never own Photoshop because it is absurdly expensive.
Love this tutorial. It is completely awesome. I am working my way through each step. Had a question on Step 18. On the selection tool part, should the mode be set to “ADD.” I thought from the tutorial that the setting was remove, but it appears to be “ADD.” Is that correct?
Thanks again. Completely awesome work you’re doing here.
Great! Thank you very much!
To do that select the move tool from the and in the top of Photoshops window select a checkbox as shown in the picture below ……….As soon as you do that the contents of an active layer will always have a transofrmation rectangle around them with the move tool selected…….2. For example look at the layers panel and youll notice Opacity and Fill controls. This works not only for the labels in layers panel – there are more interactive labels throughout the interface usually in the tool settings panel in the top of Photoshops window …….5.
Save the image below and open it in Photoshop ……….Create a new layer on top of the background and name it text shape. Since its a small background you can only write a few letters so ive decided to write FX …………Right-click on the text layer and choose Convert To Shape from the popup menu.
To do that select the move tool from the and in the top of Photoshops window select a checkbox as shown in the picture below ……….As soon as you do that the contents of an active layer will always have a transofrmation rectangle around them with the move tool selected…….2. For example look at the layers panel and youll notice Opacity and Fill controls.
Awesome job. Takes patience but totally impressive results.