

In this tutorial we will learn how to create a quick and easy, but stylish 5×7 Christmas card in Corel Paint Shop Pro X2. This tutorial should be compatible with every version of Corel Paint Shop pro, and can be easily followed in Adobe Photoshop, Gimp, Paint.net or any other Raster based photo editing program.
For this tutorial I used a couple photos my wife took during a recent Christmas photo session of my neighbor’s handsome son. I also used a free stock Christmas photo that can be found at http://www.sxc.hu/photo/1321208.
This tutorial will take you less than five minutes to complete, however, the final results are in my opinion, fantastic. We will mainly be making use of the deform tool, text tool, and the magic wand. As with most of my tutorials I will assume you have never used Paint Shop Pro before. Many things are repetitive and more advanced users will easily be able to complete this tutorial just by looking at the layer structure. If you do not feel like working through the tutorial, I have uploaded this Christmas Card Template. Click Here to download the zip file that includes both the Paint Shop pspimage and a Photoshop psd.
Lets get started!
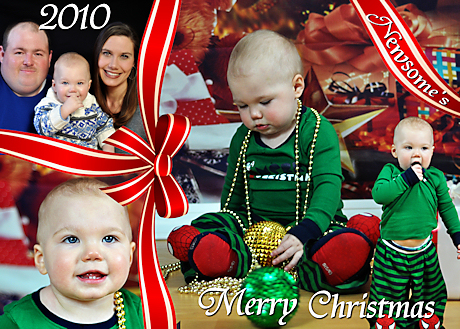
Preview of Final Results

Step 1
Go to File > New to create a new transparent image. Set the Width to 7 inches and height to 5 inches. Once created, minimize it temporarily.
.jpg)
Step 2
Download and open the Christmas ribbon photo here (http://www.sxc.hu/photo/1321208).
.jpg)
Step 3
Right click the background layer palette of the Christmas ribbon photo and duplicate. Next, toggle the visibility to off for the background layer
.jpg)
.jpg)
Step 4
Select the magic wand tool and adjust the settings to match the settings in the image below. Next, select the “copy of background” layer and remove the background using the magic wand tool. To do this, simply left click any part of the white background. Once selected, press ‘Delete’ to remove that portion of the white background. Press Ctrl + D to deselect. Repeat until you are left with a background-less ribbon. Finally, make sure the copy of background layer is selected and the go to Edit > Copy.
.jpg)
.jpg)
.jpg)
.jpg)
.jpg)
.jpg)
.jpg)
Step 5
Now, pull up the minimized 7×5 transparent image that we created in step 1 and create a new raster layer. To create a new raster layer simply right click the layer in the layers palette and select “New Raster Layer.” Rename this layer to “Ribbon.” Next, paste the background-less ribbon into this layer. Edit > Paste as new selection. Then press Ctrl + D to deselect.
.jpg)
.jpg)
Step 6
Press ‘D’ on your keyboard to pull up the deform tool. Set the deform tool to ‘scale’ mode and scale X and Y to around 30 percent. Still using the deform tool rotate the image using the rotate handle on the center axis pivot.
.jpg)
.jpg)
.jpg)
Step 7
Create a couple of new raster layers under the ribbon layer. Open up the photos you want to use for your Christmas card. Copy and paste each photo into their own layers. Use the techniques we used in the previous steps to resize and position your photos using the deform tool. Once your photos are pasted in and
positioned select the “photo 2” layer. Next, select the freehand selection tool, and set the mode to point to point. Trace the middle of the ribbon and press ‘Delete’ to remove any excess that may remain.
.jpg)
.jpg)
.jpg)
.jpg)
.jpg)
.jpg)
.jpg)
.jpg)
Step 8
Create a new raster layer and rename it “text background.” Next, select the rectangle selection tool, and draw a small rectangle selection. Now, flood fill that selection with green or a color of your choice. Finally, use the deform tool to rotate background into position.
.jpg)
.jpg)
.jpg)
.jpg)
.jpg)
Step 9
Create a couple more raster layers and add the desirable text to each layer. Set the background and foreground colors to the color you want your text to be. I used white. To pull up the text tool press ‘T’ on your keyboard. Set the font and font size to any size you desire. I used a font called “Tiranti Solid LET” set to bold, with a stroke width of 1, and font size of 100. After you add your font, drag and rotate it into place. Finally, I added a black drop shadow by going to Effects > 3d Effects > Drop Shadow.
.jpg)
.jpg)
.jpg)
.jpg)
.jpg)
.jpg)
.jpg)
.jpg)
.jpg)
Final Results
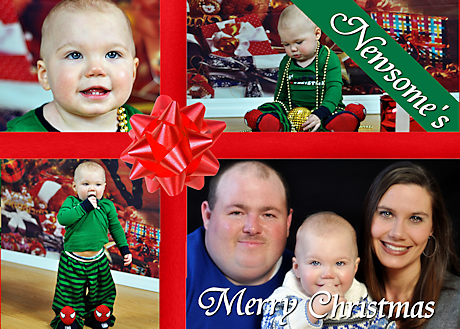
Different Variations
These same techniques I used can be used to achieve different designs and styles. Just use these techniques you have leaned in this tutorial, along with your imagination, and apply them to your own unique designs. Here a few Christmas card samples I created using similar techniques.

7 Responses
The little guy is adorable. So cute! I loved this tutorial. Merry Christmas!
WOW! Great tutorial….thank you so much!
This tutorial shows a way to do that using layers and the Deformation tool……. We will be working with this woman image so you can close the original one……Now go to Image Resize and resize the woman image to 75 of the original ..Percentage of Original 75.Resize Type Smart Size.Resize All Layers checked.Maintain aspect ratio checked…..Lets leave her like that for now and open the beach image beach.jpg……Since were adding the woman to the beach scene well first add a new layer for her in the beach image.
..Eye Candy 3.1 If you do a Google Search you may be able to find a free download its.offered as a download from time to time. Its used for the.fur so if you dont have it you could use whatever you use to make fur..A Basic knowledge of the tools in PSP…..If you name each layer it will make it much easier finding them if you.need to go back and change something..You can use my colors or choose your own. .Asymmetrical – will create a different amount of curve on each side of the node…Cusp – will create extreme changes in direction and each arm moves independently…Smooth – will create a smooth transition between straight and curved line segments…..Now lets have some fun!..We will be making the basic shapes and then doing the shading…..- 1 -..Table .New Vector Layer.
You lost me on step 7 copying & pasting the photos… sounds easy enough, but I can’t seem to get it. I’ll try again when I have an hour to spare.
PS: I couldn’t download the ribbon image. I just copy & pasted it in to a new image.
Wow… but it should have a JPG file so that i can download the ribbon..
Once the card is made, can it be printed as a 5×7 print at a photo center , or does can it only be printed onto photo paper from a computer or printing business?