

This quick tutorial will demonstrate how to quickly sharpen the eyes in Paint Shop Pro to give them that extra little sparkle.
With this little tip/effect you can make your photo subject eyes sparkle and stand out. This tutorial will take less than two minutes to complete. If you found this tip helpful please comment. Thank you for visiting.
Final Results
Here is a side by side comparison of the before and after.

Video Tutorial
A step by step video tutorial is also provided as a reference.
Step 1
Open up a photo you want that you want to make the eyes sparkle in. For this example, I used a photo of my youngest son.

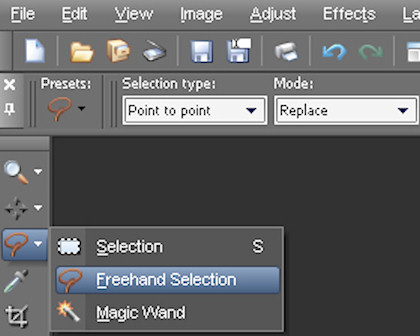
Step 2
Select the Freehand Selection tool, and set the Selection Type to Point to Point, and the the Mode to Replace.
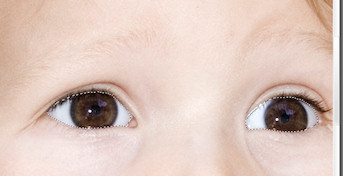
Step 3
Outline the first eye. After the first eye is outlined, hold Shift, and outline the second eye.
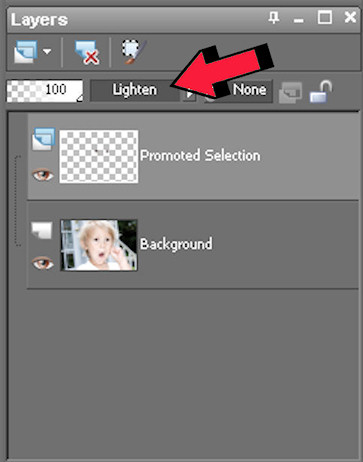
Step 4
Right click on the background layer in the layers palette, and select Promote Selection To Layer. Then set the blend mode to Lighten.
Step 5
With the Promoted Selection Layer selected go to Adjust > Sharpness > Unsharp Mask, and apply the following settings that are displayed in the image below. Radius = 3, Strength = 325, Clipping = 1. Optionally, you can experiment with your own settings. You can decrease/increase the sharpness by lowering/raising the “strength” setting. The maximum strength is 500.

Step 6
This step is optional: If you have too much sharpness and sparkle, you can lower the opacity of the Promoted Selection layer to decrease the sharpness and sparkle effect. Adjust until you are satisfied with the results.
The Before Result

The After Result

13 Responses
Great tutorial. 😉
EXCELLENT TUTORIAL THANK YOU THANK YOU
Thank you
my God! this was awesome i did it and it was great thank you!
This is pretty amazing.. Thank you for the info, Do you know how to make collages with corel? Thank you Kat
thx this was really helpful 😀
Thanks a lot 😛 Great help !!
Just started using this software yesterday and this is such a quick and easy change that really makes a difference. Thanks!
Thanks I just used it and wow does it make a big difference. keep them coming, Your tuts help so much. thanks
very very nice! I will keep coming back. Thanks a bunch!
thankyou so much , finally a tutorial that seems that it will give me the result ive been searching for ! i love paintshop pro and have used it for years and this was one little trick i needed to learn ! thankyou loads ill be testing it out tonight 🙂
Excellent tutorial! Thanks so much!
First off let me thank you for this blog. I was about to take my PaintShop x4 back because i couldnt find any good turials to teach me. Untile now. I dont understand step 4. I cant find the background layers in my layers pallet. Please help