

What are Paint Shop Pro scripts? Paint Shop Pro Scripts are commands/tasks that you record while your working, and play back/execute them again later. They allow you to be more productive by saving you time on repetitive tasks.
These scripts come in very handy for tasks such as embedding watermarks, adding titles/names/addresses, applying blurs/borders/frames, and/or any other commands/tasks you want to record. They are also a great way to save entire templates from your different projects. I use them all the time to recreate business cards, birthday cards, and/or Christmas cards. (I simply open a photo, execute my script, and it applies my previously created templates.) This may be common knowledge for some of you seasoned Paintshoppers, but for those of you that haven’t discovered Paint Shop Pro Scripts yet, I am sure you will find them very beneficial.
So how do I record and play back my own Paint Shop Pro scripts? It’s very simple actually. There are only a couple of steps. Lets take a quick look at the tutorial below. One last thing to note, you can also download and use pre-made scripts that others have made. A quick Google search for “paint shop pro scripts” should land you quite a few results.
Step 1
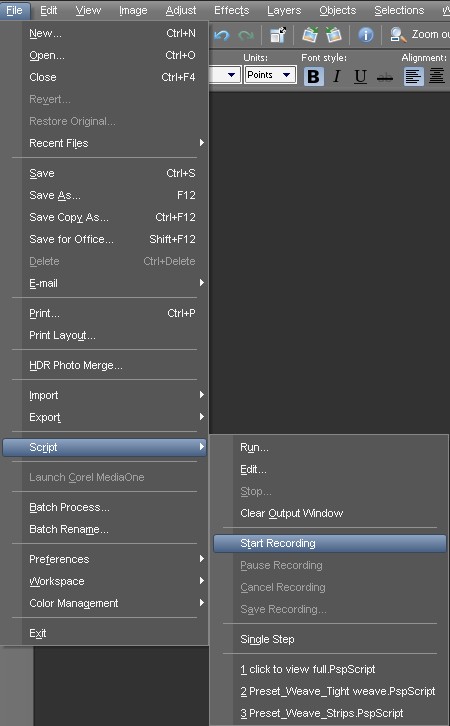
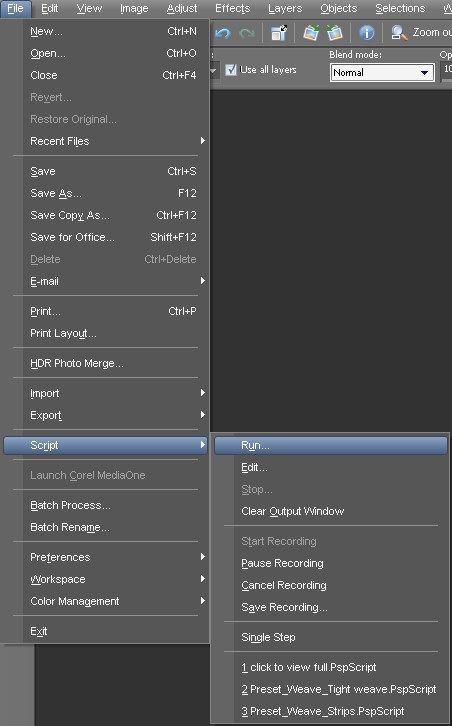
Open up Paint Shop Pro, and then turn on script recording. File > Script > Start Recording
Step 2
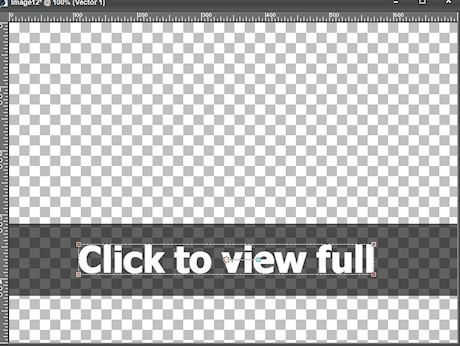
Now, issue some commands to Paint Shop Pro. For example, you could open up a photo and apply your favorite border, and/or embed a watermark. Whatever you decide, PSP is going to record all the commands you give, and will play back/apply those commands/tasks whenever you need them. NOTE: I created a script that will create the following layered image below. This script is very beneficial to me because it saves me time. Take for example, I often use this script on the final step of most tutorials here at Paintshopblog. This is so readers will know to click the image, to view the larger resolution.
Here is what the script does, it creates a transparent background, draws a rectangle selection, flood fills it with black, lowers the opacity of the black selection to 40 percent, creates a new raster layer, applies “Click to view full” white text on the new layer, centers the text, sets the font to Tahoma, and the font size to 20. As you can see, by recording these repetitive tasks, I can save myself about 10 steps of work. Now, anytime I need to apply this, I just execute my saved script, and the image below is what I get. For me, 1 step > 10 steps.. Very Nice!
Step 3
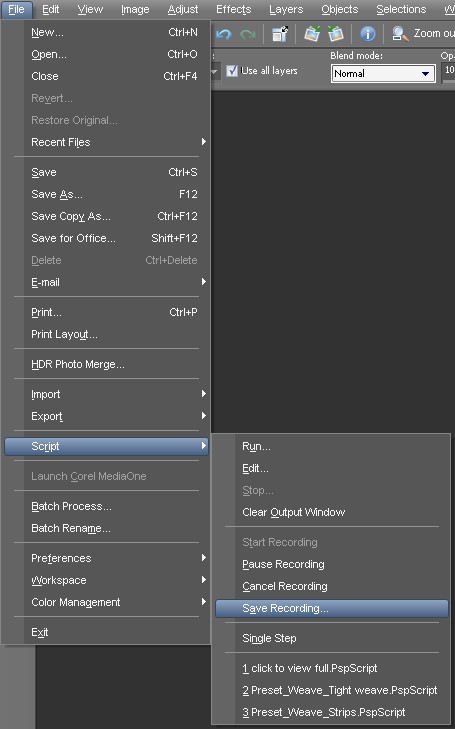
Once you are finished issuing commands to Paint Shop Pro. Simply go to File > Script > Save Recording.
Step 4
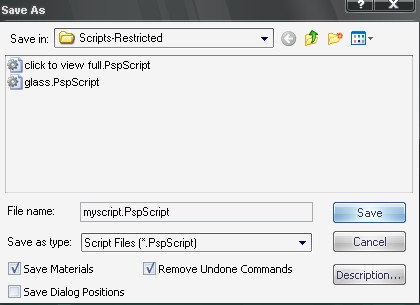
You will be prompted to name and pick a location to save your script. Name your script and click Save. NOTE: I always just save my scripts in Paint Shop Pro’s default script directory. `
Step 5
Finally, your script is now available for you to use anytime. To execute the script, simply go to File > Script > Run. Then select one of the scripts you have created, and watch Paint Shop Pro quickly execute the script
14 Responses
A very useful tutorial.
To make it even easier, a handy thing you can do for a frequently used script is adding it as an icon in your toolbar.
View–>Customize–>Scripts.
From here you can select a script, attach an icon to it, and place it in your toolbar.
^Thank you for that very useful tip, I will put it to good use. I did not know you could add icons in the toolbar for custom scripts. I learn something new everyday. Thanks again.
omg! thanks so much i wanted to re weite the movie the eye
sismal waw
moi hhhhhhhhhhhhhhhh
O maque t aven extasier, a Haydn thiamine sou an do for a fréquenter user script
I need help as to how do you actually record the script (ie how do you “issue a command”), I understand what they can do, but how do you actually record the script. I need to resize a batch of files.
so basically the steps would be:
1. open the file
2. resize the file to 374 pixels in height (maintaining perspective)
3 close the file, and
4. save the file in a specified folder.
Can you show me how to put these commands into a script.
Thanks in advance.
Larry B.
Here is a video tutorial on how to bind scripts to make the whole process even faster when using the same scripts over and over again.
http://scrapbookcampus.com/tips-tricks/binding-scripts-in-paintshop-pro/
Enjoy!
Thanks for this tutorial ! It will be easy to make a script with it for the beginners !
Me, i know to make script. But i have a little problem. And i don’t yet find the solution. Perhaps, you’ll can help me….
I make a script in order to create a ribbon with 2 colours. But i want to change colors when i run the script. And it doesn’t ask me to choice them. I read the text of the script : the action ” to change color ” isn’t alterable even if i choose an interactive action.
I hope that you can answer to me.
thanks
Your guides are truely a blessing. It is soooo easy to find photoshop guides and so hard to find GOOD Paintshop pro guides. Great Job with all your stuff Man. Keep it up.
Thank you Allen.
Cassel, Thank You for sharing that link on scripts! It was awesome i must say! Less then 4 minutes and it was worth wild!
Jarrod, your tutorials are excellent!
Your site here is what I refer people to for good quality tutorials!
And to Corel’s Discovery Center as well (http://www.corel.com/corel/pages/index.jsp?pgid=12300114#all2)
Keep it up and I’ll keep coming back and referring you as well!
Thank You!!!
Thanks for this tutorial ! It will be easy to make a script with it for the beginners !
Me, i know to make script. But i have a little problem. And i don’t yet find the solution. Perhaps, you’ll can help me….
I make a script in order to create a ribbon with 2 colours. But i want to change colors when i run the script. And it doesn’t ask me to choice them. I read the text of the script : the action ” to change color ” isn’t alterable even if i choose an interactive action.
I hope that you can answer to me.
thanks
——————
You need to open the script in a program like Notepad or such and edit the code. That is when you need to add a snippet like this:
App.Do(Environment, ‘MsgBox’, {
‘Buttons’: App.Constants.MsgButtons.OK,
‘Icon’: App.Constants.MsgIcons.Info,
‘Text’:
‘Choose the color, gradient, or pattern’
})
COLOR = App.Do(Environment,’GetMaterial’,{
‘IsPrimary’:App.Constants.Boolean.true,
‘GeneralSettings’: {
‘ExecutionMode’:App.Constants.ExecutionMode.Interactive
}
})
That will get the script to ASK for a color/gradient/pattern, and store your choice in the COLOR variable. THEN, you can replace the color that will appear in the command where you need it (ex: fill) and the line that would otherwise be:
‘FillMaterial’: {
‘Color’: (226,204,160),
‘Pattern’: None,
‘Gradient’: None,
‘Texture’: None,
‘Art’: None
},
could now look like
‘FillMaterial’: COLOR,
The variable COLOR is up to you to decide and if you need more than one color you can call them COLOR1, COLOR2, COLOR3. The name is totally up to you as the word can be anything. I tend to use ALL CAPS, simply for commodity, but it does not HAVE to be like that either.
If you want to learn more about scripting, and actually coding scripts, there is a course available in my Campus, offered by Suz Shook, a great teacher:
http://scrapbookcampus.com/paintshop-pro-scripting-course/
Hope it helps
Unfortunately, the code above didn`t keep the correct spacing in front of each line. Email me if you need that snippet.