
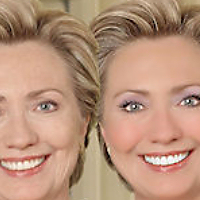
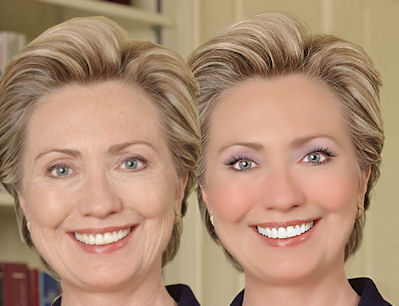
This tutorial will demonstrate how you can easily smooth skin, remove blemishes and wrinkles from a photo subject. You can watch the video of the process featuring a photo of Senator Hilary Clinton. Hilary looks 10 to 15 years younger after the makeover.
To make the makeover more dramatic, I brightened up the teeth, added some eyelashes, (BTW, you can download the lips and eye brushes here), added some coloring, and sharpened the final photo. Using the steps below you can follow along with the video. This tutorial should work for versions 10-X2
* Duplicate the original layer. Select the duplicated layer by clicking on it. (This step is optional, but recommended because you want to be able to toggle visibility on and off so you can see the results as you work).
1. Select Freehand Selection tool: Selection Type: Point to Point
2. Draw a selection around the face/area that you want to de-wrinkle and/or smooth out.
3. To remove areas (such as the eyes and lips) of the initial selection simply hold Ctrl while selecting with the selection tool.
4. After the selections are complete, go to Adjust > Skin Smoothing. I set the amount to 100. You may need to decrease the Amount depending on the amount of wrinkles or skin smoothing needed. If you are satisfied then press CTRL + D to deselect.
5. If you don’t achieve the skin smoothing results you desire with the first pass – then repeat step number 4 on the whole selection and/or just select the problematic areas. For example, in the above video I had some wrinkles still left around the eyes and jaws after the initial skin smoothing pass. Because the rest of skin was already smoothed, out just select the areas around the eyes and applied the skin smoothing tool to those areas.
6. If you installed the eyelash brushes then go ahead and create two new layers by right clicking on the duplicated layer and selecting new raster layer twice.
7. Select the eyelash brush of your choice, set the foreground to black, and resize them to fit your photo subjects eyes. Place an eyelash on each layer. One layer for the right eye and one layer for the left eye. All the eyelash brushes you downloaded have a left orientation. To give an eyelash a right orientation simply mirror the layer that you used for the right eye. Image > Mirror. If the eyelashes do not line up correctly use the move tool and/or warp brush push tool to align them perfectly.
8. With the duplicated layer selected select makeover tool > toothbrush and brighten up the teeth. Then create a new raster layer and select the makeover tool > Suntan – and set the strength to around 15. Paint the areas you want to apply the tan.
9. Create another raster layer and select a round paint paint brush. Set the size to around 50, the opacity to 6, and set the foreground color to red. Now make a couple of passes across the nose and cheeks to give the photo subject a slight blush.
10. Create another raster layer and select a round paint brush. Set the size to around 50, the opacity to 6, and the foreground color to blue (or color you desire). Now make a couple passes across the eyelid to give the photo subject some eye color.
11. Save the image as a pspimage just in case you want to make future adjustments.
12. Make sure the original layers visibility is turned off and Right click the top layer and choose Merge > Merge Visible.
13. Now select the merged layer and choose Adjust > Sharpness > Unsharp Mask. Settings Radius = 2, Strength = 100, Clipping = 5. Applying the effect will make the image more sharp/crisp and really brighten up the facial features.
That’s about it. Have fun with your future makeovers.
7 Responses
I really enjoyed this video! Very helpful!
Wow… you do incredible stuff here! I stumbled upon your site when I was looking for a quicker way to convert my .png images to brushes….sort of a bulk “lazy” way to do it since I have so many I need to convert lol.
I started poking around to see what you had tutorials on…as I love to learn new stuff…and I am in awe. Kudo’s to you! Thanks for offering your talents with others for free…there isn’t many of our kind left out there…at least none that are worth mentioning lol…
You are appreciated.
Thanks!
Hi, I’m quite new to Corel but I do enjoy it and your tutorials are the most helpful ones I’ve found on the web. Could you please tell me how to make a person look thinner? But not using the thinify mode, it makes it all look unnatural. When I try the warp push brush it doesn’t look well either. Thanks,
Monika.
we must admit that Hilary Clinton is indeed a very good politician. She did well on her political career that is why Obama appointed her as a secretary of state.
Your site is great, I learned many things, you’re really nice to explain everything in details! J’aimers to the tutorial (mother-in-law that I have seen on youtube, but unfortunately I can not find it on your site.Ou could have please? Because it is really impressive and I really cela.Merci know how much, excuse my English
I am unable to watch the video of the Hilary Clinton makeover. It is sooooo fast I can hardly see what you are doing let alone try to learn from it! The thing is, it looks great and I would love to be able to do the same on photos of myself as I’m looking a little older now. So please let me know if you have another version of this video that is slower!! I have to say… you really have a great talent. Good luck for you future. kathy
For some of the hard to smooth areas, you might try the scratch-remover tool.