
First off, I want to share the story behind the creation of this project. If any of you have read my bio in the About me section, then you already know that I am one of the biggest Kentucky Basketball and Football fans on this planet and possibly others.
To stay up-to-date with the latest Wildcat recruiting and other news surrounding the program, I often frequent Rupp Rafters over at catsillustrated.com, a UK fan forum.
A couple days after Nerlens Noel announced he was going to offer his basketball services to the Kentucky Wildcats and John Calipari, a member that goes by funKYcat75 started a thread titled “Photoshop: Where in the Universe is/was Nerlens Noel?” Needless to say, I couldn’t resist creating something. I love the Cats, I love Paint Shopping and/or Photoshopping (whatever you want to call it).
It just so happens, at the time of reading that thread I was working on an Avatar tutorial featuring one our friends (Olivia) to post on here. I had already developed the basic technique, so I decided to throw something together featuring Nerlen Noel as an Avatar too. You got to remember, I literally threw this together in 30 minutes or so. I thought it would receive a few laughs and then be buried under the endless content that is posted daily to Rupp Rafters. I didn’t even bother watermarking the photo with a link or anything.
Fast Forward two days later and the original photo goes viral. I found it on countless websites, across Facebook, NBCSports and Nerlenes Noel’s twitter feed. Needless to say, I really missed a good opportunity to promote paintshopblog.com. Oh well, life goes on. Honestly, I was just flattered the photo actually got the attention it did across the internet. You gotta love the power of the Big Blue Nation. BTW, there are several others in that same thread that caught the attention of Noel and other media outlets across the internet. I love our fan-base, and the passion we all share.
Fast forward a couple more days and I have had numerous people ask me how I created the “Avatar Photoshop.” Well, here is a step by step tutorial for everyone interested in learning how the effect was achieved, using Paint Shop Pro, not Photoshop. However, the effects can be applied using either program.
The Olivia Avatar tutorial I will be posting later is much more detailed compared to this, but I wanted to stay true the to original Noel “Photoshop” design for the following the tutorial. After all, it is the one that went viral.
Remember, like all my tutorials, I assume you have never used the program before and walk you through every step. If you are an experienced Paint Shop Pro or Photoshop user you will be able to follow along just by viewing the photos throughout the steps.
Lets get started!
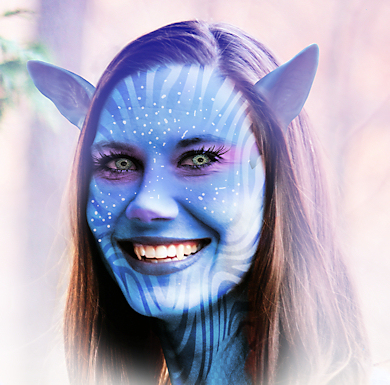
Olivia Avatar
This is the project that I mentioned I was working on when discovering the Noel Thread. BTW, thank you Liv for allowing me to use your photo for the original “How to create an Avatar in Paint Shop Pro” tutorial that will be posted here at a later date.
YouTube Video
Reserved for youtube video of this project.

Step 1
Open the photo in Paint Shop Pro. (Image of Nerlens Noel can be found at http://www.hoopscapital.com/high-school-spotlight). Next, select the Freehand Selection tool and set the mode to point to point.
Step 2
Using the Freehand Selection Tool outline the body. Once the outline is complete, save the selection to the Alpha Channel. Rename the Alpha selection to “body outline.” Next, right click on the Background Layer in the Layers Palette and select Promote Selection To Layer.
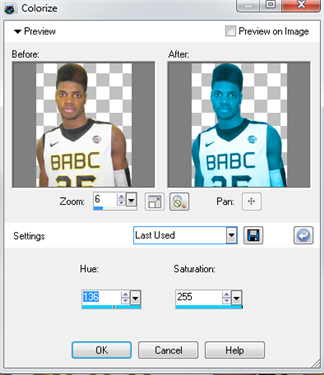
Step 3
With the Promoted Selection layer active, select Adjust > Hue & Saturation > Colorize. Set Hue to 136 and the Saturation to 255(Or adjust to your liking). Finally, press CTRL+D to deselect the active selection. Rename the Promoted Selection layer to “skin coloring”
Step 4
Select the Freehand Selection Tool and outline Noel’s flat top. Press ‘delete’ on your keyboard to remove the selection. Press CTRL+D to deselect active selection. Repeat the process for Noel’s jersey. Save the selection to Alpha Channel and rename it “jersey.”
Step 5
Create a New Raster Layer (Layers > New Raster Layer) and rename it “lips coloring.” Next, use the Free Hand Selection tool to out line the lips. Flood Fill the selection with color #315684. Set the blend mode to ‘overlay’ and lower the opacity to around 60 percent. If you want the lips darker or lighter increase/decrease the opacity accordingly.
Step 6
Next we will add the Avatar ears. The ears can be found here or you can search “Avatar Ears” using Google for different variations. Open the ears up in Paint Shop Pro. Right click the background layer in the layers palette and select Duplicate. Next, toggle OFF the visibility on the background layer. Finally, click on the white background with the Magic Wand tool to select it. Next press ‘Delete’ on your keyboard to remove the white background on the duplicated layer.
.png)
.png)
Step 7
Use the FreeHand Selection tool to copy each ear. Select one of the ears, then go to Edit > Copy. Create two New Raster layers on the Avatar project and rename them ‘Left Ear’ and ‘Right Ear’ and paste each ear in the newly created layers (Edit > Paste as New Selection). Press ‘D’ on your keyboard to pull up the Deform tool. Use the Deform tool (scale mode) to scale and position the ears. Finally, use the Freehand Selection tool to select the areas of the ear that overlap the Nerlen Noel’s face. Use the Delete key to remove the selections. TIP: Lower the opacity of the ears to make it easier to draw the selection around the contour of the face. Press CTRL+D to deselect active selections.
Step 8
Next we need to add some stripes. You can find both zebra Avatar stripes or tiger Avatar stripes patterns with a quick Google search. Either will work depending on your preference. Create a New Raster Layer and rename the layer to “face stripes.” Next, copy and paste the stripes on the “face stripes” layer. Set the blend mode to darken and the opacity to around 22. Use the deform tool (Press ‘D’) to scale and position the stripes. Repeat this process for the left and right arms too.
Step 9
Go to Selections > Load/Save Selection > Load Selection from Alpha Channel and load the “body outline” selection. Next, select Selections > Invert to invert the selection and press ‘Delete’ to remove that selection. Press CTRL+D to deselect.
Step 10
Using the Freehand Selection tool outline the jersey and press ‘Delete’ to remove any stripes that are visible on the jersey. Make sure you ‘Delete’ from all three stripe layers “left arm stripes,” “right arm stripes,” and “face stripes.” Finally, use the eraser brush to erase the stripes that are still visible in areas such as in the hair line, eyes, and lips. I lower the eraser brush opacity setting as I get closer to skin in order to create a blending effect.

Step 11
Now for the eyes. I have seen similar “Avatar Photoshops” use cat eyes. I ended up going with this human eyeball because I liked the color and detail. Use whatever suits your design tastes. Open the eye photo in Paint Shop Pro and use the Freehand Selection Tool to outline the eyeball. Copy the eyeball selection(Edit > Copy). Create two New Raster Layers and rename them “left eye” and “right eye.” Paste (Edit > Paste as New Selection) the eyeball into each layer. Use the Deform tool(CTRL+D) to scale and position the eyeballs.
Step 12
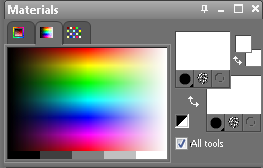
Create two New Raster Layers and rename them “white freckles high” and “white freckles low.” Next, select the Paint Brush tool, set the Foreground and Background to white in the Material Properties. Apply some Round white brush strokes while occasionally varying the size of the brush to create the freckles. I placed them randomly over the face in the high layer, and the entire body on the low layer.

Step 13
Next, load the “body outline” from the Alpha Selection. Once loaded, select the Freehand Selection Tool and hold down “Shift” while you outline the ears. Hold shift allows you to add to the existing selections.
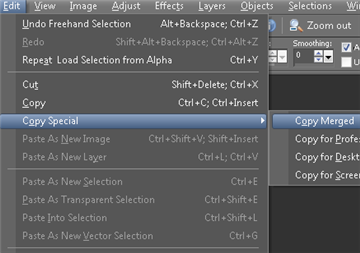
Step 14
Now that you have the body and ears in one selection, go to to Edit > Copy Special > Copy Merged. This will create a merged copy of all the layers within your selection. OPTIONAL: Also, you might want to save the Noel project as a pspimage before proceeding for future reference, editing or adjustments.
Step 15
Find an Avatar Background and open it up in Corel Paint Shop Pro. Just search “Avatar Wallpaper” at Google Images to find the Avatar image you want to use.Create a New Raster Layer on the Avatar Background and rename it “noel avatar.” Next, Go to Edit > Paste as New Selection and paste the merged copy of Noel that we copied in the previous step. Use the Deform tool (CTRL+D) to resize and position.
Step 16
Next, merge down the “noel avatar” layer. After you merge, right click the “background” layer and select Duplicate. Rename the layer to “curves adjustment.” Now, apply the Curve Adjustment to the Blue Channel (push the curve slightly up) to balance the tone and contrast (Adjust > Brightness & Contrast > Curves). Lower the opacity of the “curves adjustment” layer until you are satisfied with the coloring. It looked best on my screen around 65 percent opacity.
Step 17
Finally, merge the two layers into one and this project is complete. Go to File > Save As and save to your favorite photo format.
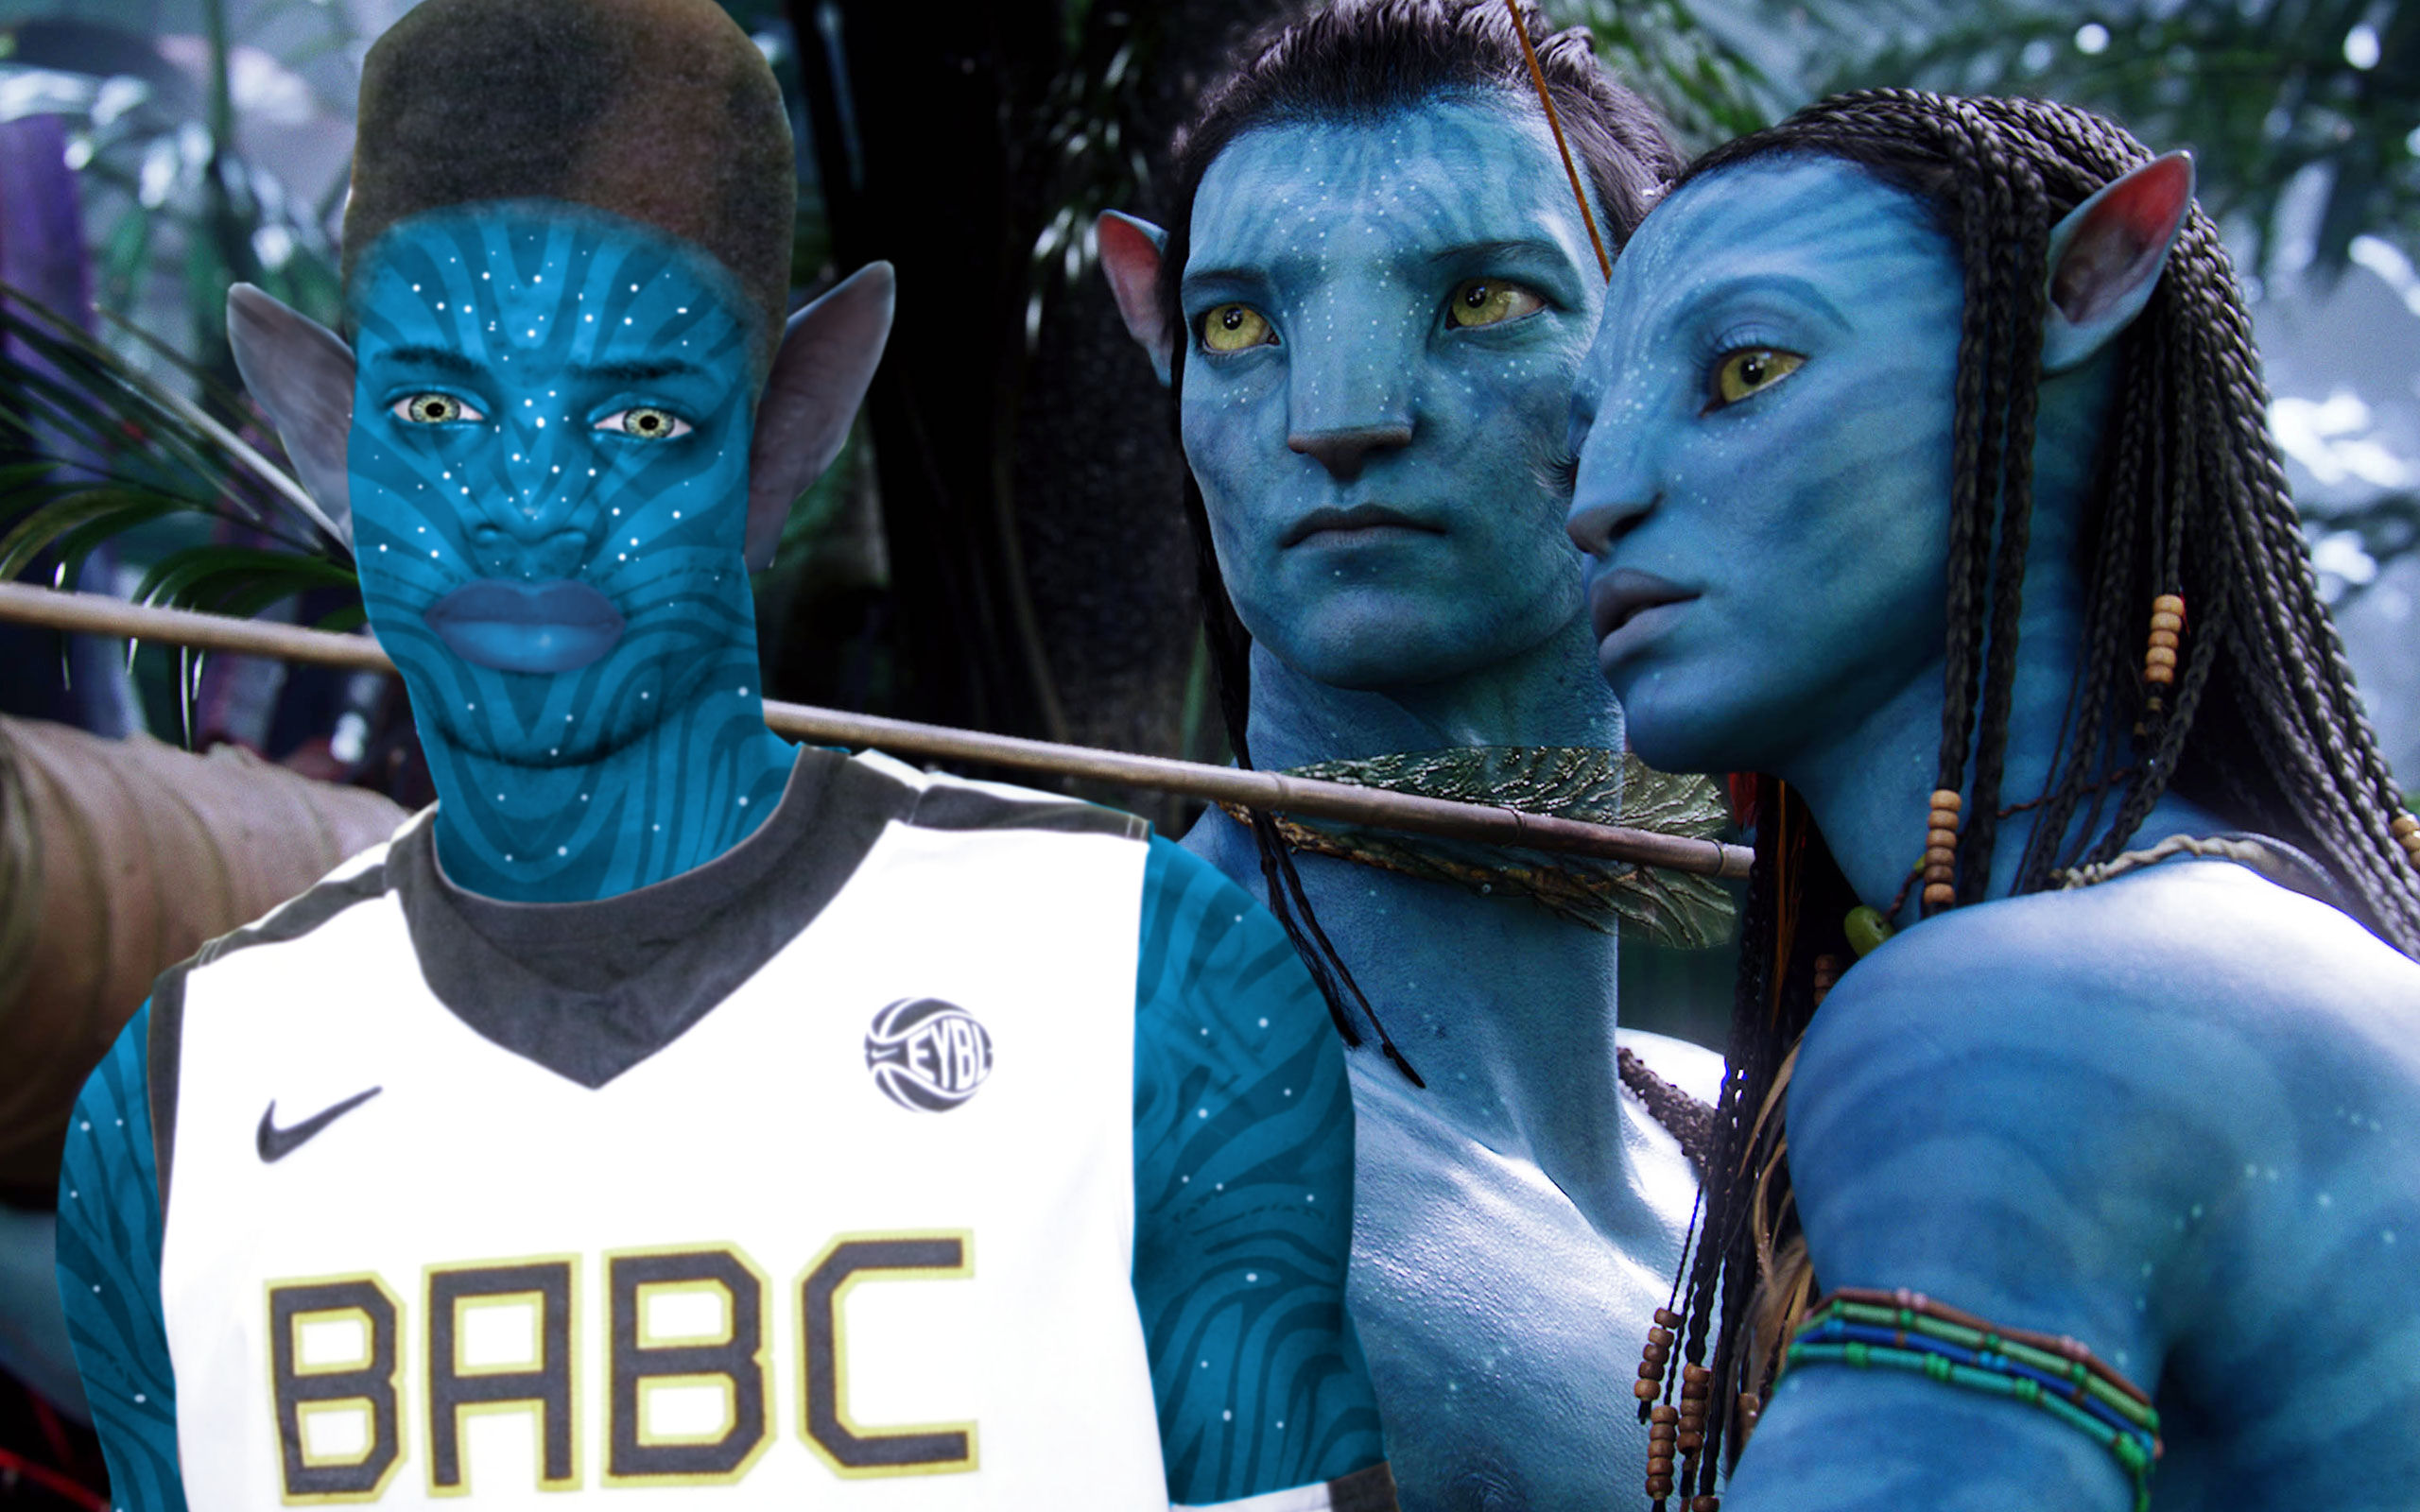
Final Results.
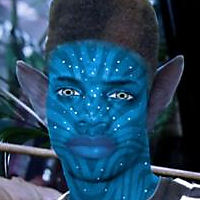
Nerlins Noel Kentucky Recruit on Pandora (Higher Resolution version here). Kentucky opposition better Fear the Flattop 😉
3 Responses
Great Story torQQue and congratulations on going viral! And thanks for all your PSP tips. None better. GO WILDCATS!
Thanks chiPersei, I appreciate the compliments and I’m glad I can help. You said it best, GO WILDCATS!
Really interesting post from your side, i haven’t read all your posts but whatever i read those were quite interesting.